Halloween Spider No Bake Cookies
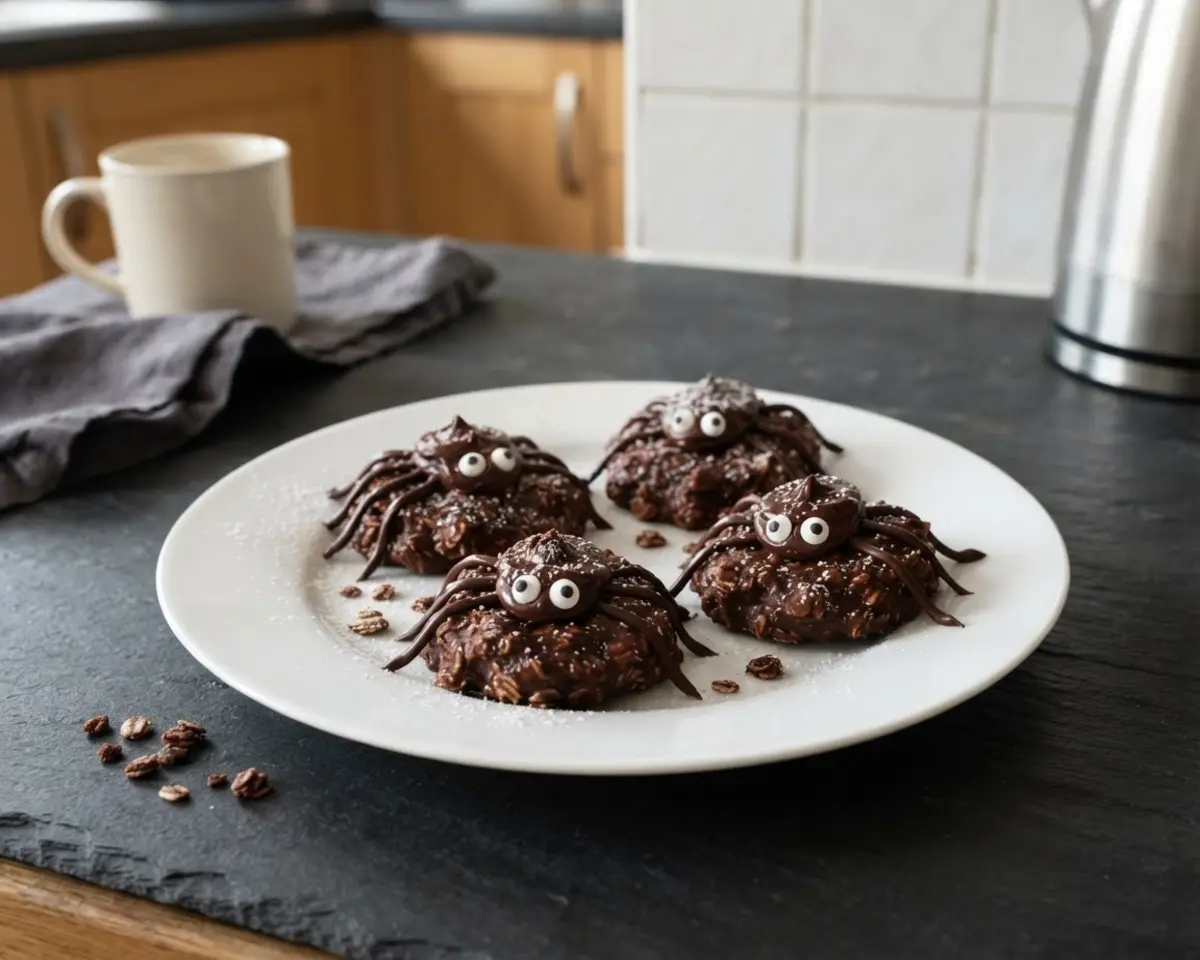
Halloween Spider No Bake Cookies hit my kitchen the second October arrives. There’s no oven involved—just a saucepan, old fashioned oats, and creamy peanut butter working together. The sugar, butter, and milk melt into a glossy mixture, then the oats stir in thick and fudgy.
Licorice legs poked into each blob turn plain cookies into tiny spooky spiders, and candy eyes seal the deal. I scorched my first batch waiting way too long for that “full boil,” and now I time it to the second.
Table of Contents
What Are Halloween Spider No Bake Cookies?
Halloween spider no bake cookies are a stovetop peanut butter oat treat shaped into circles, studded with licorice legs and candy eyes, with a fudgy, chewy bite and no oven required.
- Melt sugar, butter, milk, and cocoa in a saucepan until it reaches a rolling boil.
- Boil exactly one minute, stirring so the bottom doesn’t scorch.
- Stir in peanut butter, vanilla, and oats until glossy and thick.
- Drop spoonfuls onto waxed paper and press licorice legs into each side.
- Shape into circles with your fingers after five minutes of setting.
- Add candy eyes and let cool fully for ten minutes.
- Stovetop vs. microwave: stovetop gives steady control over the boil, microwave risks scorching fast.
- Peanut butter vs. almond butter: peanut butter holds shape better and tastes classic.
- Old fashioned oats vs. quick oats: old fashioned oats stay chewy, quick oats turn mushy.
- Licorice legs vs. pretzel legs: licorice bends easily, pretzels snap and crumble apart.
Stick with stovetop cooking, old fashioned oats, and soft licorice for the chewiest, most spider-authentic cookie every single time.
Why You’ll Love This Halloween Spider No Bake Cookies
These cookies win Halloween parties because they taste like a peanut butter fudge brownie disguised as a spider. They’re fast, forgiving, and genuinely fun to build with kids.
- No oven, no mixer—just one saucepan and about ten minutes of stirring from start to finish.
- The texture lands right between fudgy brownie and chewy oatmeal cookie, which is hard to resist.
- Kids can press the licorice legs in themselves, making these some of the easiest no bake halloween cookies for little hands to help with.
- I learned that letting the dough rest exactly five minutes before shaping keeps the spiders from sliding apart—rushing it cost me a whole tray of blobs once.
- They hold their shape at room temperature through an entire party without melting or drying out on the table.
If you’re newer to this style of treat, our easy no bake cookies for beginners guide walks through the basic technique before you dive in.
Ingredients
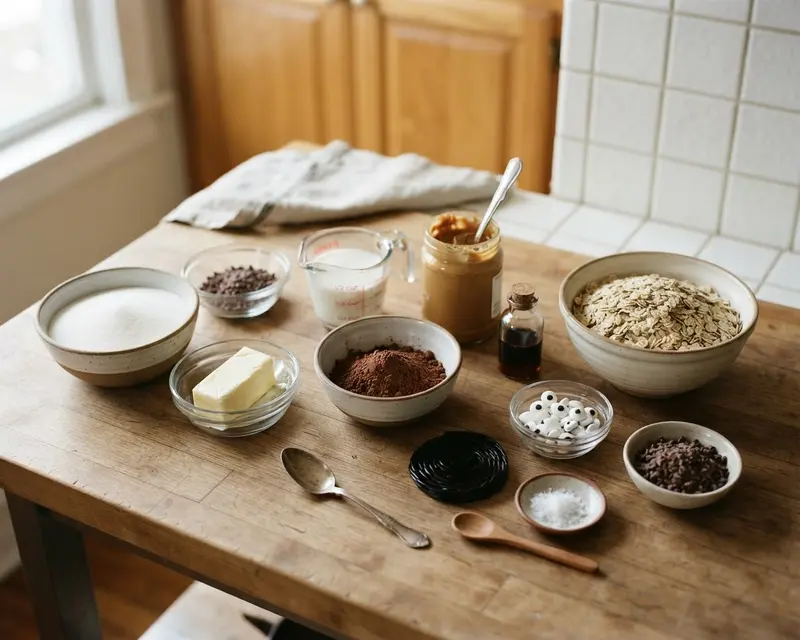
These easy no bake halloween cookies use a short pantry list to make spooky no bake treats that taste way fancier than the effort required. The peanut butter spider cookies get their web-like legs from pull apart licorice, and this same base is how you build classic spider web cookies no bake style.
| Amount | Ingredient |
|---|---|
| 2 cups | Sugar |
| 1 stick | Butter |
| 1/2 cup | Milk |
| 5 tablespoons | Baking cocoa |
| 1/2 cup | Creamy peanut butter |
| 1 teaspoon | Vanilla |
| 3 cups | Old fashioned oats (use organic gluten free oats for a gluten free version) |
| As needed | Candy eyes |
| As needed | Pull apart licorice |
The creamy peanut butter is my favorite part of this whole recipe—it’s what keeps every bite tasting rich instead of just sugary.
What Equipment Do You Need to Make Halloween Spider No Bake Cookies?
A heavy-bottomed saucepan prevents the most common mistake here, which is scorched sugar on the bottom of the pan. Everything else on this list is stuff most kitchens already have.
| Tool | Purpose |
|---|---|
| Essential: Heavy-bottomed saucepan | Distributes heat evenly so the sugar mixture doesn’t scorch while boiling. |
| Essential: Wooden spoon or silicone spatula | Stirs constantly without scratching the pan during the boil. |
| Essential: Waxed paper | Keeps the sticky cookie drops from fusing to the counter as they set. |
| Essential: Kitchen scissors | Cuts the pull apart licorice into clean two-inch spider legs. |
| Optional: Cookie scoop | Gives each spider body a more uniform size and shape. |
| Optional: Candy tweezers | Helps place tiny candy eyes exactly where you want them. |
How Do You Make Halloween Spider No Bake Cookies Step by Step?
Halloween Spider No Bake Cookies come together in three fast phases: boiling the base, shaping the spiders, and letting them set.
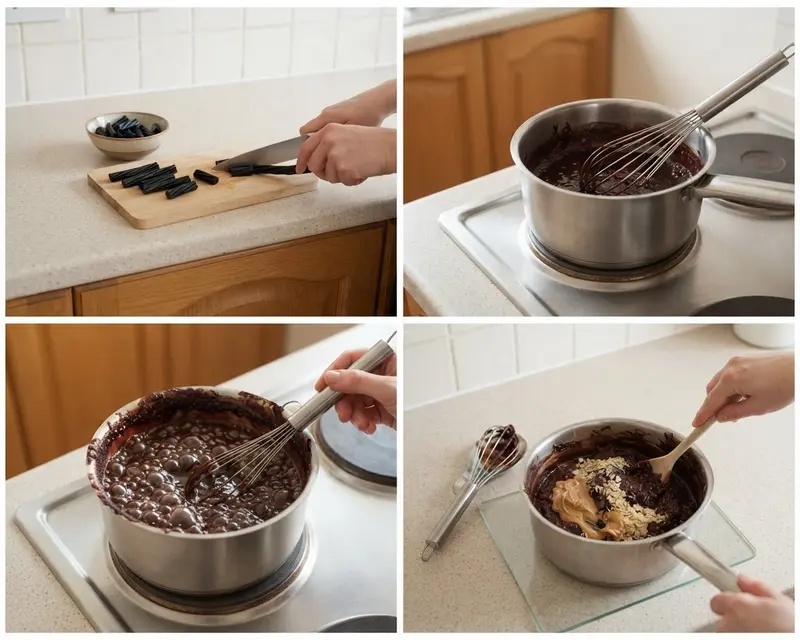
Making the Chocolate Peanut Butter Base
- Add the sugar, cocoa, butter, and milk to a saucepan over medium heat. Stir constantly until everything melts into a smooth, glossy liquid. [If it looks separated at first, keep stirring—it comes together.]
- Bring the mixture to a full rolling boil, then set a timer for exactly one minute. Watch for big, steady bubbles across the whole surface, not just the edges.
- Pull the pan off the heat the second that minute is up. Boiling longer dries the mixture out and makes crumbly cookies instead of fudgy ones.
Shaping and Legging the Spiders
- Quickly stir in the peanut butter, vanilla, and oats while the base is still hot. Work fast—the mixture firms up as it cools, so stir until it’s evenly combined and glossy.
- Drop rounded spoonfuls onto waxed paper, leaving a little space between each one. Immediately push four licorice sections into each side for legs while the dough is still soft enough to grip them.
- Let the cookies sit untouched for about five minutes. The edges firm up just enough to hold a shape without sticking to your fingers.
Finishing Touches
- Use your fingers to gently round each cookie into a neat circle. Press two candy eyes onto the top of each spider while the surface is still slightly tacky.
- Let the finished cookies cool completely for about ten minutes on the counter. They’ll firm up into that classic fudgy, chewy no bake texture as they cool.
Pro Tips for Perfect Halloween Spider No Bake Cookies
What separates good spider cookies from great ones comes down to timing the boil and moving fast once the oats go in. A few small habits make a real difference batch after batch.
The one-minute boil matters because sugar syrup moves through distinct stages as it heats, and overshooting even by thirty seconds pushes it past soft-ball territory.
King Arthur Baking’s notes on sugar syrup stages explain why that extra minute makes cookies grainy instead of fudgy.
After six or seven batches, I found that measuring the oats before you even start the saucepan saves you from a frantic scramble once the boil hits. The window to stir them in is shorter than it looks.
I learned the hard way that soft licorice works far better than firm licorice ropes, which crack instead of bending into leg shapes. Pull apart licorice gives just enough flex to curve naturally like a real spider leg.
Working in small batches of six to eight cookies at a time keeps the mixture from hardening in the pan before you finish shaping. If it does start to stiffen, a few seconds back over low heat loosens it right up.
Troubleshooting: When Something Goes Wrong
Why did my cookies turn out crumbly instead of fudgy? This almost always means the sugar mixture boiled past one minute. Time the boil with an actual timer next round instead of eyeballing it.
Why won’t the licorice legs stay in the cookie? The dough was likely too cool by the time you pressed them in. Work in smaller batches so each cookie gets shaped while it’s still warm and pliable.
Can I fix cookies that never set up firm? Yes—pop the whole tray in the fridge for fifteen minutes. Humid kitchens slow the setting process, so a little chill speeds things along.
How do I stop the candy eyes from sliding off? Press them on while the cookie surface is still slightly tacky, not after it’s fully cooled. A tiny dab of leftover chocolate mixture works as glue if needed.
What if my mixture seizes up before I add the oats? Return the pan to low heat for ten seconds while stirring gently. It should loosen back into a pourable consistency quickly.
Variations & Ways to Customize
This recipe flexes easily for dietary needs and flavor swaps without losing that classic fudgy spider texture. Here are the versions my readers ask about most.
Seasonal Halloween Spider No Bake Cookies Variation
Swap the candy eyes for orange and black sprinkles pressed into the top before the legs go in. It keeps the Halloween look even if you’re out of candy eyes at the store.
Gluten-Free Halloween Spider No Bake Cookies
Use certified organic gluten free oats in place of regular old fashioned oats—the measurements and cook time stay exactly the same. Double check your cocoa and vanilla brands too, since a few contain hidden gluten.
White Chocolate Halloween Spider No Bake Cookies
Replace the baking cocoa with an extra half cup of powdered sugar and stir in white chocolate chips off heat for a pale, ghost-colored spider base. For more flavor ideas, our no bake chocolate oatmeal cookies recipe is a great next stop.
Can You Make Halloween Spider No Bake Cookies Ahead of Time?
Yes, these keep well for days, which makes them one of the better spooky no bake treats for party prep. Just store them properly so the texture stays fudgy instead of dry.
Serve them at room temperature alongside a Halloween cider or hot cocoa bar. They taste best within the first two days when the oats are still at their chewiest.
They do firm up slightly in the fridge, losing a touch of that just-made softness. A quick five minutes on the counter before serving brings most of that texture right back.
| Method | How Long | Details |
|---|---|---|
| Room Temperature | 2-3 days | Store in an airtight container with waxed paper between layers to protect the candy eyes. |
| Fridge | Up to 1 week | Keeps cookies firmer and prevents melting in warm kitchens, though texture gets slightly denser. |
| Freezer | Up to 2 months | Freeze in a single layer first, then stack in a sealed container to keep legs from breaking. |
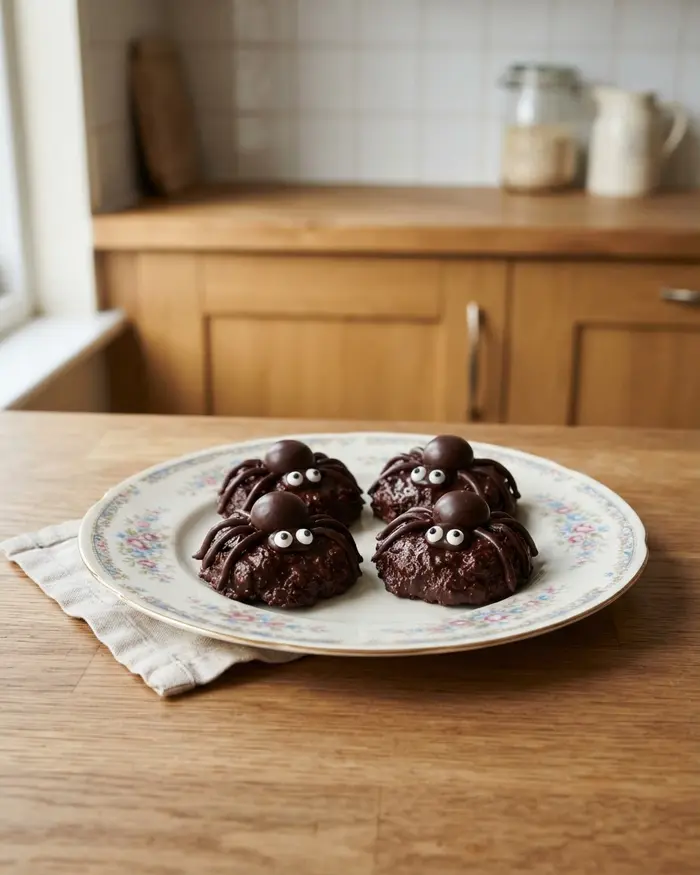
To reheat, there’s no need for an oven—just let frozen cookies thaw on the counter for about twenty minutes. They return to a soft, fudgy bite without any extra work.
Halloween Spider No Bake Cookies FAQs
Can you make no bake cookies on a rainy day?
Yes, you can make no bake cookies on a rainy day if you boil the sugar mixture for a full 3 minutes at a rolling boil instead of the usual 1 to 1.5 minutes. The extra boil time offsets the moisture in the air, and chilling the cookies in the fridge for 30 minutes helps them set faster.
Why won’t my no bake cookies harden when it’s humid?
Humid air adds moisture back into the cookies as they cool, which keeps the sugar from hardening. The usual boil time doesn’t drive off enough water to overcome the dampness, so the cookies stay soft and sticky. A longer boil (3 minutes at a rolling boil) fixes the problem.
What temperature should no bake cookies reach in humid weather?
In humid weather, the sugar mixture should reach 235°F to 240°F (113°C to 116°C) instead of the usual 230°F (110°C). The higher temperature gives the sugar the structure it needs to set despite the moisture in the air. Use a candy thermometer clipped to the side of the pan to check.
How long do no bake cookies take to set in humid weather?
No bake cookies take 30 to 40 minutes to set in humid weather if you chill them in the fridge. At room temperature, they can take an hour or more, and sometimes they won’t set at all if the air is very damp. The fridge trick speeds up the process and guarantees a firm result.
Can you fix no bake cookies that didn’t set because of humidity?
If your no bake cookies didn’t set because of humidity, put them in the fridge for 30 minutes. The cold will firm them up even if the boil was a little short. If they’re still a puddle after an hour in the fridge, the boil was too short to save them, but you can use the mixture as an ice cream topping.
Final Thoughts
Halloween Spider No Bake Cookies earn their spot on every October dessert table because they’re fast, fun, and genuinely delicious beyond the holiday theme. Drop a comment below if you try them or have a question about the boil time—I answer every single one.
For more stovetop treats, check out our ultimate guide to no bake cookies.
Baked with love by Rebeccah Ellene, who has tested this exact recipe through more than a dozen Halloween batches in her own kitchen.
Spooky Spider No-Bake Cookies for Halloween Treats
Ingredients
Ingredients
- 2 cups sugar
- 1 stick butter
- ½ cup milk
- 5 tablespoons baking cocoa
- ½ cup creamy peanut butter
- 1 teaspoon vanilla
- 3 cups old fashioned oats use organic gluten free oats for a gluten free version
- Candy eyes
- Pull apart licorice
Instructions
- Cut licorice ropes into about 2-inch sections.
- In a saucepan add the sugar, cocoa, butter, and milk. Stir constantly and melt together over medium heat until it comes to a full boil.
- Let the mixture boil for 1 minute then remove from heat.
- Quickly add the peanut butter, vanilla, and oats. Stir to combine.
- Drop by spoonful onto waxed paper. Shove the licorice sections into the cookies–four on each side for the spider legs.
- After about 5 minutes use fingers to shape cookies into perfect circles. Add candy eyes to each spider.
- Let finish cooling for about 10 minutes.