Easy Strawberry Funfetti Cake
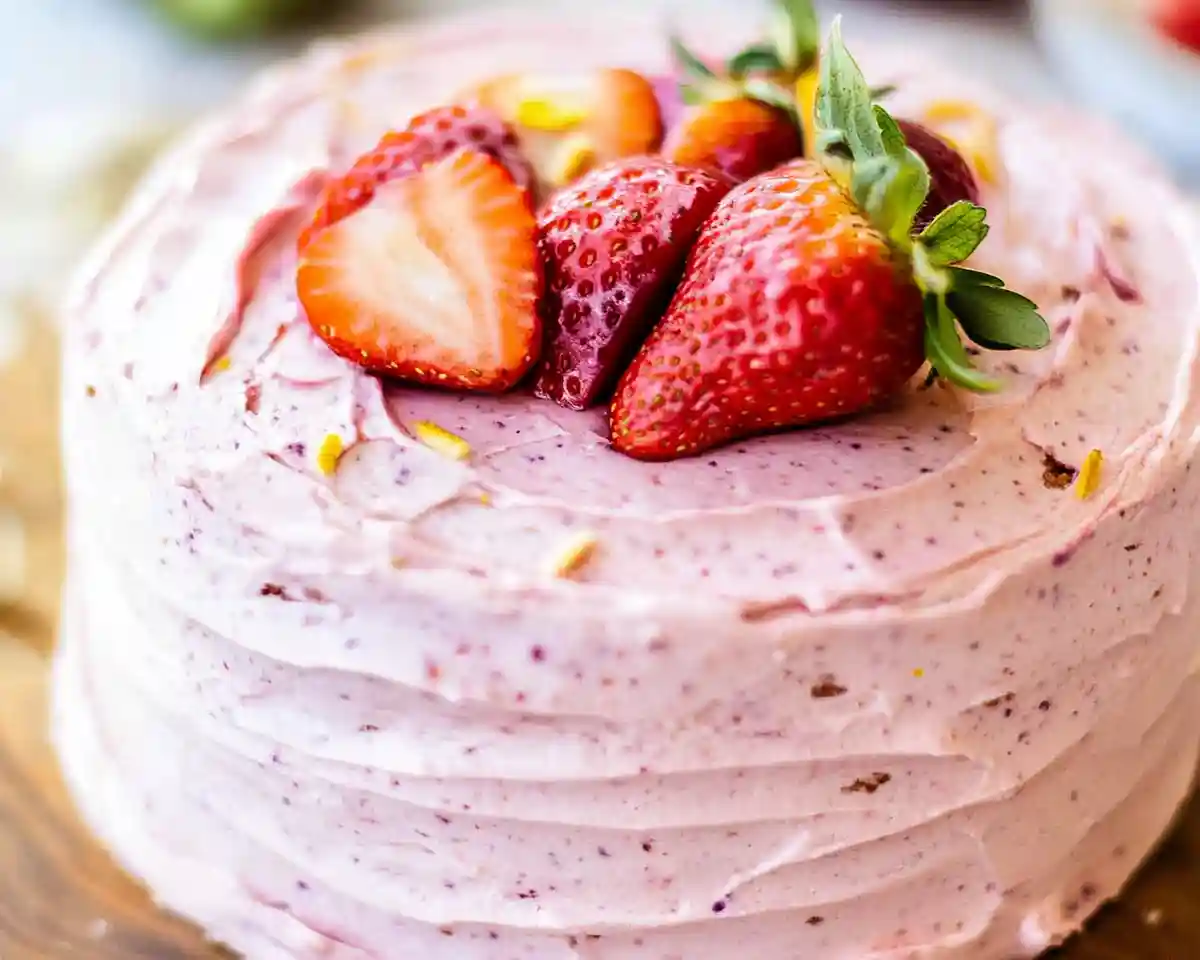
This strawberry funfetti cake combines fluffy vanilla layers, fresh strawberry filling, and dreamy strawberry buttercream—perfect for celebrations!
What Makes This Strawberry Funfetti Cake Special?.0.00
This strawberry funfetti cake layers light, sprinkle-studded vanilla cake with homemade strawberry filling made from fresh berries, tangy lemon juice, and a silky strawberry buttercream frosted with freeze-dried strawberries and powdered sugar for intense berry flavor in every bite.
I’ve been making this strawberry confetti cake for years now, and honestly? It never gets old. There’s something about those colorful jimmies peeking through tender vanilla cake that just makes people smile before they even take a bite.
The real magic happens when you cut into it and find that gorgeous strawberry filling nestled between the layers.
Love towering layer cakes? Our mile high chocolate cake delivers the same showstopping presentation with rich chocolate layers—perfect for chocolate lovers at your celebration.
Table of Contents
Strawberry Funfetti Cake That’ll Make Every Birthday Magical
Equipment
- Two 8″ or 9″ round cake pans
- stand mixer or hand mixer
- mixing bowls
- Whisk
- rubber spatula
- Medium saucepan
- Offset spatula
- Piping bag
- Cake turntable
- Cooling racks
Ingredients
Funfetti Cake Layers
- 4 egg whites room temperature
- ½ cup butter softened
- 3 Tbsp canola oil or vegetable oil
- 1 ½ cups granulated sugar
- 2 cups all-purpose flour
- ¼ cup cornstarch
- ¾ tsp salt
- 1 Tbsp baking powder
- 1 cup milk whole milk is best
- 1 ½ tsp vanilla extract
- ¼ tsp almond extract optional
- 1 cup colored jimmies cylindrical sprinkles
Strawberry Filling
- 1 cup strawberries chopped
- ¼ cup granulated sugar
- 1 Tbsp lemon juice
- 1 Tbsp all-purpose flour
Strawberry Buttercream
- 1 cup butter softened
- 3-4 cups powdered sugar
- 1 cup crushed freeze-dried strawberries
- 3-4 Tbsp heavy cream
- 1 pinch salt to taste
Topping
- fresh strawberries
- extra jimmies for garnish
Instructions
- Preheat your oven to 350°F and grease two 8″ or 9″ round cake pans. Line the bottoms with parchment circles for foolproof release.
- Whip egg whites until stiff peaks form using a clean, dry bowl. You’ll know they’re ready when you can flip the bowl upside down and nothing moves. Set aside gently.
- Cream the softened butter for 1-2 minutes until light and fluffy. Add the oil and granulated sugar, then beat for another 1-2 minutes.
- Sift together the all-purpose flour, cornstarch, salt, and baking powder in a separate bowl.
- Alternate adding the flour mixture and milk to the butter mixture, starting and ending with flour. Mix until just combined to avoid developing gluten.
- Stir in the vanilla extract, almond extract, and colorful jimmies until just combined.
- Gently fold the whipped egg whites into the cake batter using a rubber spatula with broad, sweeping motions from the bottom up and over.
- Divide the batter evenly between your prepared pans and smooth the tops. Tap the pans on the counter to release air bubbles.
- Bake for 20-22 minutes, until a toothpick inserted in the center comes out clean. Let cool in pans for 10 minutes, then turn out onto cooling racks completely.
- For the strawberry filling: Combine chopped strawberries, sugar, lemon juice, and flour in a medium saucepan over medium heat. Stir occasionally as the mixture comes to a boil.
- Once boiling, reduce heat to medium-low and simmer for 10-12 minutes until thickened and jammy. Transfer to a bowl and let cool completely.
- For the buttercream: Beat the softened butter for 3-4 minutes until almost white and incredibly fluffy.
- Gradually add powdered sugar, starting with 3 cups, adding half a cup at a time. Beat well after each addition.
- Add 3 tablespoons of heavy cream and beat until smooth. Adjust consistency with more cream or powdered sugar as needed.
- Mix in the crushed freeze-dried strawberries until evenly distributed. Add a pinch of salt to balance sweetness.
- To assemble: Place one cake layer on your serving plate. Spread a thin layer of strawberry buttercream over the top.
- Fill a piping bag with about 1/3 of the remaining frosting and pipe a thick border around the outer edge to create a dam.
- Spoon the cooled strawberry filling into the center within the frosting dam and spread evenly.
- Pipe a thin layer of frosting over the filling and carefully spread it with an offset spatula to prevent filling from soaking into the top layer.
- Gently place the second cake layer on top and press down lightly to adhere.
- Spread the remaining buttercream over the top and around the sides. Top with fresh strawberries and extra jimmies.
- Serve at room temperature for best flavor and texture. The cake comes to room temp from the fridge in about 30-60 minutes.
Notes
Nutrition
Why You’ll Love This Strawberry Sprinkle Cake
This strawberry funfetti birthday cake checks every box. First off, it’s surprisingly easy—no fancy techniques required, just good old-fashioned mixing and folding. The whipped egg whites create this incredibly fluffy texture that stays moist for days (if it lasts that long).
The homemade strawberry filling is a game-changer. Sure, you could use store-bought jam, but taking ten minutes to simmer fresh strawberries with lemon juice creates this bright, not-too-sweet filling that actually tastes like real fruit. Wild concept, I know.
Here’s what really won me over: the freeze-dried strawberries in the buttercream. I tested this recipe about seven times before landing on this version, and using freeze-dried berries instead of puree keeps the frosting stable and pipeable while delivering authentic strawberry punch. No artificial flavoring needed.
According to King Arthur Baking, folding whipped egg whites into cake batter creates structure without gluten development, resulting in that characteristic tender, almost angel-food-cake texture that makes people ask for seconds.
The sprinkles add festive crunch without making the cake overly sweet. I prefer cylindrical jimmies over round nonpareils—they hold their shape better during baking and don’t bleed color into the batter.
Nutritional Information Per Serving
| Nutrient | Amount |
|---|---|
| Calories | 520 |
| Protein | 5g |
| Carbohydrates | 78g |
| Fat | 22g |
| Fiber | 1g |
| Sugar | 62g |
Ingredients for Your Strawberry Funfetti Cake

This strawberry confetti cake starts with pantry basics you probably already have. The ingredient list looks long, but it’s really just three simple components working together.
Funfetti Cake Layers
| Amount | Ingredient | Notes |
|---|---|---|
| 4 | egg whites | Room temperature works best for whipping |
| 1/2 cup | butter, softened | European-style butter adds richness |
| 3 Tbsp | canola oil (or vegetable oil) | Keeps the cake tender and moist |
| 1 1/2 cups | granulated sugar | |
| 2 cups | all-purpose flour | Spoon and level for accuracy |
| 1/4 cup | cornstarch | This is the secret to that bakery-soft texture |
| 3/4 tsp | salt | |
| 1 Tbsp | baking powder | Check the expiration date—fresh matters |
| 1 cup | milk | Whole milk gives the best flavor |
| 1 1/2 tsp | vanilla extract | Pure, not imitation |
| 1/4 tsp | almond extract | Optional but adds depth |
| 1 cup | colored jimmies | Cylindrical sprinkles hold up best |
Strawberry Filling
| Amount | Ingredient |
|---|---|
| 1 cup | strawberries, chopped |
| 1/4 cup | granulated sugar |
| 1 Tbsp | lemon juice |
| 1 Tbsp | all-purpose flour |
Strawberry Buttercream
| Amount | Ingredient | Notes |
|---|---|---|
| 1 cup | butter, softened | Beat it longer than you think |
| 3-4 cups | powdered sugar | Add gradually for smooth texture |
| 1 cup | crushed freeze-dried strawberries | Find these in the snack aisle |
| 3-4 Tbsp | heavy cream | Adjust for consistency |
| pinch | salt | Balances sweetness perfectly |
Topping
- Fresh strawberries
- Extra jimmies for garnish
Equipment You’ll Need
Essential tools:
- Two 8″ or 9″ round cake pans
- Stand mixer or hand mixer (both work great)
- Mixing bowls in various sizes
- Whisk and rubber spatula
- Medium saucepan for filling
- Offset spatula for frosting
- Piping bag (a ziplock bag works in a pinch)
Nice to have:
- Cake turntable for easier frosting
- Cooling racks
- Cake leveler for perfectly flat layers
How to Make This Strawberry Funfetti Cake Step by Step
Making this strawberry funfetti birthday cake is easier than it looks. The key is working in stages and letting each component shine.
Prepare the Cake Layers
- Preheat your oven to 350°F and grease two 8″ or 9″ round cake pans. I like using butter and a light dusting of flour, but baking spray with flour works beautifully too. Line the bottoms with parchment circles for foolproof release.
- Whip those egg whites until stiff peaks form using a clean, dry bowl. You’ll know they’re ready when you can flip the bowl upside down and nothing moves (do this over the bowl just in case). Set them aside gently—we’ll fold them in later.
- Cream the softened butter for 1-2 minutes until it’s light and fluffy, almost pale. Add the oil and granulated sugar, then beat for another 1-2 minutes. This extended creaming incorporates air bubbles that make the cake texture impossibly tender.
- Sift together the all-purpose flour, cornstarch, salt, and baking powder in a separate bowl. Sifting isn’t just fancy—it aerates the dry ingredients and prevents lumps from forming in your batter.
- Alternate adding the flour mixture and milk to the butter mixture, starting and ending with flour. This means: add 1/3 of the flour, mix, add 1/2 the milk, mix, add another 1/3 flour, mix, add remaining milk, mix, add final flour, mix until just combined. Overmixing develops gluten strands that create tough, dense cake.
- Stir in the vanilla extract, almond extract, and those colorful jimmies until just combined. The almond extract is optional, but it adds a subtle bakery-style depth that people can’t quite identify but absolutely love.
- Gently fold the whipped egg whites into the cake batter using a rubber spatula. Use broad, sweeping motions from the bottom of the bowl up and over, rotating the bowl as you go. A few white streaks are fine—better slightly undermixed than deflated.
- Divide the batter evenly between your prepared pans and smooth the tops. I use a kitchen scale for perfect layers, but eyeballing works too. Tap the pans on the counter a couple times to release air bubbles.
- Bake for 20-22 minutes, until a toothpick inserted in the center comes out clean or with just a crumb or two. The cakes should spring back when lightly pressed. Let them cool in the pans for 10 minutes, then turn out onto cooling racks completely before frosting.
Make the Strawberry Filling
- Combine chopped strawberries, sugar, lemon juice, and flour in a medium saucepan over medium heat. Stir occasionally as the mixture comes to a boil—the flour will thicken everything while the lemon juice brightens the berry flavor.
- Once boiling, reduce heat to medium-low and simmer for 10-12 minutes until thickened and jammy. You want it thick enough that it doesn’t run off a spoon, but not so thick it’s gummy. The mixture will thicken more as it cools.
- Transfer to a bowl and let it cool completely before assembling. Warm filling will melt your buttercream, and nobody wants that mess.
Whip Up the Strawberry Buttercream
- Beat the softened butter for a full 3-4 minutes until it’s almost white and incredibly fluffy. This step is crucial—it incorporates air and creates that silky, pipeable texture professional bakers achieve.
- Gradually add powdered sugar, starting with 3 cups, adding half a cup at a time. Beat well after each addition. The mixture will look crumbly at first, then come together beautifully.
- Add 3 tablespoons of heavy cream and beat until smooth and creamy. If the frosting seems too stiff for spreading, add the remaining tablespoon of cream. If it’s too loose, add more powdered sugar.
- Mix in the crushed freeze-dried strawberries until evenly distributed. These add incredible strawberry flavor without making the frosting watery like fresh berries would. Add a pinch of salt to cut the sweetness—it makes all the other flavors pop.
Assemble Your Masterpiece
- Place one cake layer on your serving plate or cake stand. Use a dab of frosting underneath to keep it from sliding around—little professional trick.
- Spread a thin layer of strawberry buttercream over the top of the first layer. This is your crumb coat for the filling layer, sealing in moisture.
- Fill a piping bag with about 1/3 of the remaining frosting and pipe a thick border around the outer edge. This creates a dam that prevents the filling from squishing out when you add the top layer. No piping bag? Just use a thick rope of frosting applied with a spoon or ziplock bag with the corner snipped.
- Spoon the cooled strawberry filling into the center within the frosting dam. Spread it evenly, staying within the borders.
- Pipe a thin layer of frosting over the filling and carefully spread it with an offset spatula. This barrier layer prevents the juicy filling from soaking into the top cake layer and making it soggy.
- Gently place the second cake layer on top and press down lightly to adhere. Don’t smash it—just a gentle press ensures everything sticks together.
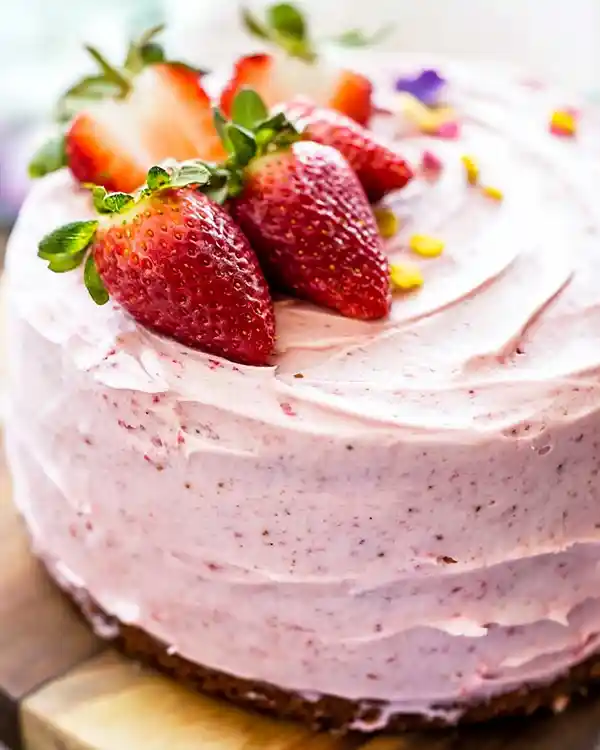
- Spread the remaining buttercream over the top and around the sides. You can do a smooth finish, rustic swirls, or whatever style makes your heart happy. Top with fresh strawberries and extra jimmies for that wow factor.
- Serve at room temperature for the best flavor and texture. The cake comes to room temp from the fridge in about 30-60 minutes. Individual slices warm up much faster—about 15 minutes.
Pro Tips for Bakery-Perfect Results
This strawberry sprinkle cake benefits from a few insider tricks. Room-temperature ingredients are non-negotiable—cold eggs and butter don’t emulsify properly, creating a dense, uneven crumb. Bring butter and eggs to about 65-70°F before starting.
According to Serious Eats, room-temperature ingredients incorporate more evenly because fat and water-based ingredients combine into a stable emulsion. When ingredients are too cold, the fat doesn’t disperse properly, resulting in a grainy, separated batter that bakes into a tough cake.
Don’t skip sifting the dry ingredients. Cornstarch clumps easily, and those lumps create pockets of raw starch flavor in your finished cake. Two minutes of sifting prevents twenty minutes of regret.
The whipped egg whites are what make this cake special. Make sure your bowl and beaters are completely grease-free—even a tiny bit of fat prevents proper whipping. I wipe mine down with white vinegar before starting.
Fold, don’t stir, when adding egg whites. Stirring deflates all those beautiful air bubbles you just created. Use broad strokes and stop as soon as you don’t see large white streaks.
For the filling, that tablespoon of flour is important. It thickens without making the filling gummy like cornstarch sometimes does. The lemon juice balances sweetness and enhances strawberry flavor.
What If Something Goes Wrong?
Why is my cake dense instead of fluffy? You probably overmixed after adding the flour or deflated the egg whites too much when folding. Next time, mix just until you don’t see dry flour streaks, and use gentle folding motions for the whites.
What if my strawberry filling is too runny? Cook it a bit longer until it coats the back of a spoon thickly. You can also add another teaspoon of flour at the beginning. If it’s already made, simmer it for a few more minutes until it reduces.
Can I fix buttercream that’s too soft? Absolutely! Pop it in the fridge for 15-20 minutes, then rewhip. If it’s still soft, beat in more powdered sugar a tablespoon at a time. Too stiff? Add cream by the teaspoon.
Why did my cake sink in the middle? Your oven might be running hot, causing the outside to set before the center finishes rising. Use an oven thermometer to check actual temperature. Opening the oven door too early can also cause sinking.
What if my frosting tastes too sweet? Add that pinch of salt—it’s a game changer. You can also add a teaspoon of lemon juice or a tiny bit of vanilla to balance the sweetness.
Fun Variations to Try
This strawberry funfetti cake adapts beautifully to different flavors and dietary needs. Swap the strawberry filling for raspberry, blueberry, or even lemon curd for different fruit profiles. The freeze-dried fruit in the buttercream can match whatever filling you choose.
For a chocolate strawberry version, replace 1/4 cup of flour with cocoa powder in the cake layers. The combo is ridiculously good.
Going gluten-free? Use a 1:1 gluten-free flour blend that includes xanthan gum. The texture won’t be quite as fluffy.
Want to make this dairy-free? Use vegan butter and plant-based milk in both the cake and frosting. The freeze-dried strawberries work perfectly in vegan buttercream.
For smaller gatherings, halve the recipe and bake in two 6″ pans for a cute mini version. Adjust baking time to about 18-20 minutes.
For another fruit-forward layer cake bursting with fresh flavor, try our lemon blueberry Bundt cake—tender, moist, and perfect for spring celebrations.
How to Serve, Store, and Reheat
Serve this strawberry confetti cake at room temperature for the best flavor experience. The buttercream softens, the cake becomes tender, and all the flavors bloom. If you’re serving a crowd, slice the cake while it’s cold (cleaner cuts), then let slices warm up for 10-15 minutes.
Store leftovers covered in the refrigerator for up to 5 days because of that fresh strawberry filling. The cake actually gets more flavorful after a day as the strawberry notes infuse the layers.
Can you freeze strawberry funfetti cake? Yes, but freeze it unfilled and unfrosted for best results. Wrap layers tightly in plastic wrap, then foil, and freeze for up to 3 months. Thaw overnight in the fridge before assembling. If you must freeze an assembled cake, the filling texture changes slightly but it’s still delicious.
Zero-Waste Kitchen Tips
Don’t toss those egg yolks! Make homemade custard, lemon curd, or hollandaise sauce. They also freeze beautifully—just whisk with a pinch of sugar or salt and freeze in ice cube trays for future use.
Strawberry stems and leaves can go straight into your compost. If you have extras from trimming, make strawberry-infused water or add them to smoothies.
Leftover cake scraps (from leveling layers) make incredible cake pops or trifle bases. Crumble them, mix with extra frosting, roll into balls, and dip in melted chocolate. Done.
The freeze-dried strawberry dust left in the bag? Sprinkle it over yogurt, oatmeal, or ice cream. It’s basically strawberry pixie dust and shouldn’t go to waste.
Strawberry Funfetti Cake FAQs
Can I make this strawberry funfetti cake ahead of time?
Absolutely! Bake the cake layers up to 2 days ahead, wrap tightly, and refrigerate. Make the filling and frosting a day ahead too. Assemble the cake the day you’re serving for the freshest presentation.
What’s the best substitute for freeze-dried strawberries in the buttercream?
You can use strawberry jam reduced by half in a saucepan to concentrate flavor, but the frosting may be slightly softer. Freeze-dried berries give the most intense flavor without adding moisture that affects texture.
Why did my jimmies bleed color into the cake batter?
This happens when sprinkles sit in wet batter too long or if you overmix. Fold them in gently at the very end, and get the cake into the oven quickly. Quality jimmies (not nonpareils) bleed less.
Can I use this recipe to make cupcakes instead?
Yes! This makes about 24 cupcakes. Fill liners 2/3 full and bake at 350°F for 16-18 minutes. Core the centers, fill with strawberry filling, and frost generously.
How do I get smooth buttercream frosting?
Beat the butter longer than you think necessary—4 full minutes. Add powdered sugar gradually, and make sure everything is at proper room temperature. An offset spatula dipped in hot water helps smooth the final layer.
What can I use instead of almond extract?
Just use 2 teaspoons of vanilla extract instead. The almond adds depth, but the cake is still wonderful without it. Never skip the vanilla though—it’s essential for flavor balance.
Time to Celebrate!
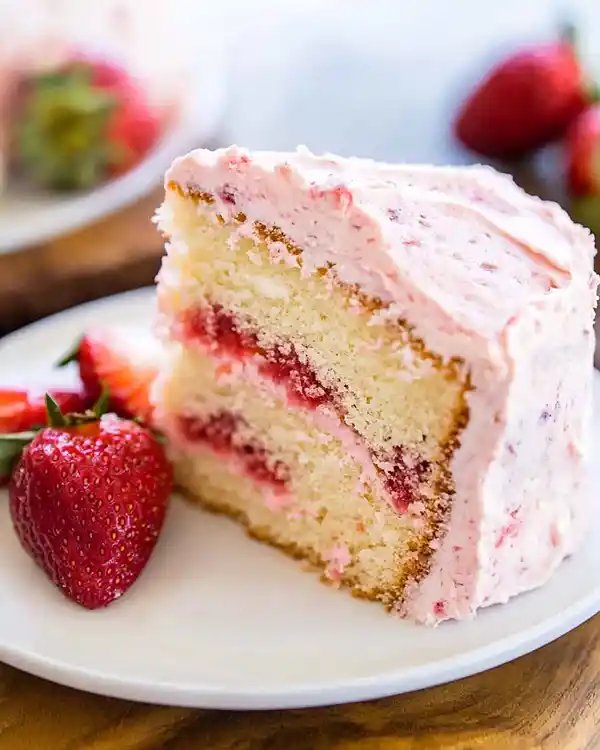
There’s something really special about slicing into this strawberry funfetti cake and watching everyone’s faces light up. The colorful sprinkles, the vibrant strawberry filling peeking out, that fluffy pink buttercream—it just screams celebration.
Whether you’re making it for a birthday, graduation, or just because Tuesday needs more joy, this cake delivers happiness on a plate.
I’d love to see your creation! Tag your photos with your decorating style or any fun variations you tried. And if you’re planning a dessert table.
Baked with love by Rebeccah Ellene

