No Bake Chocolate Lasagna
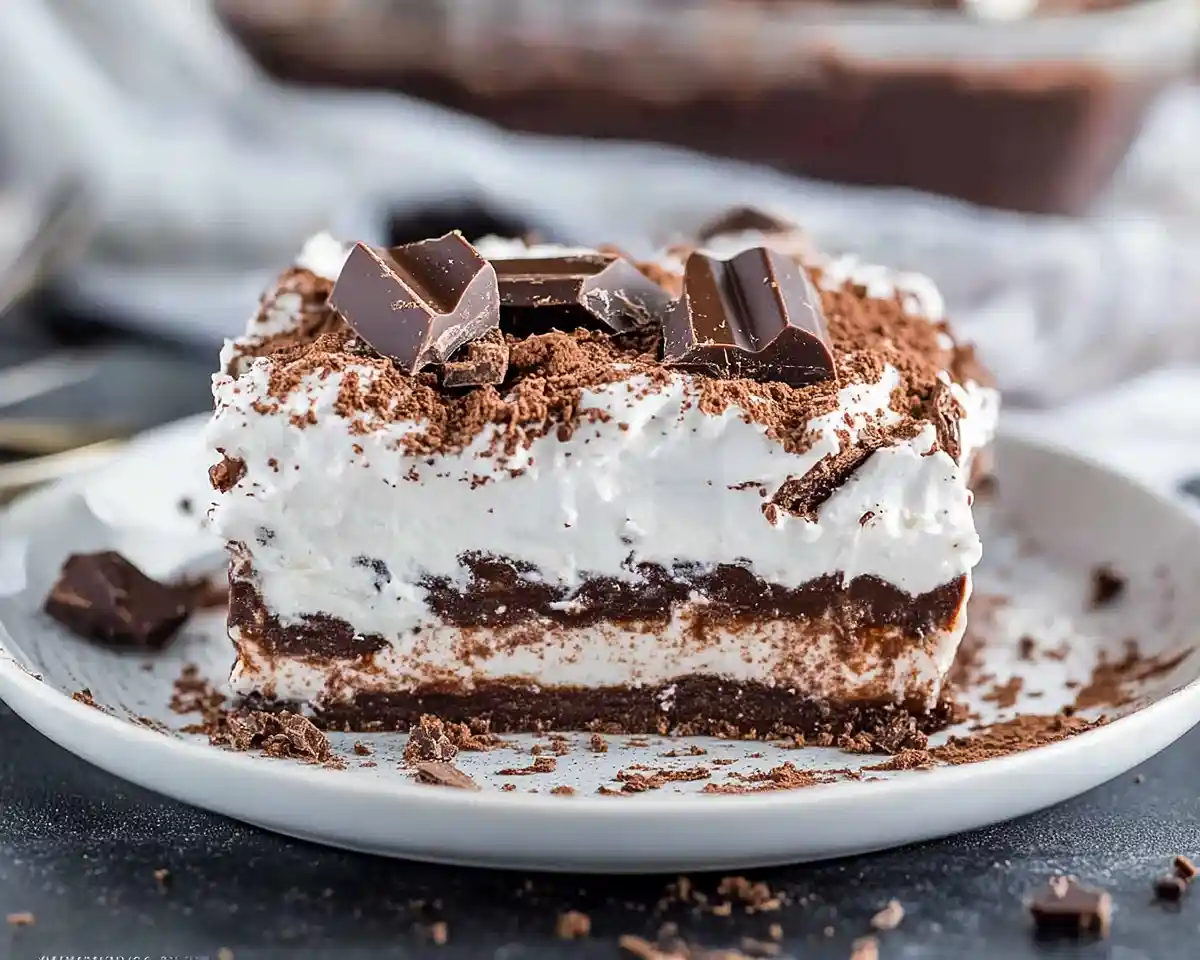
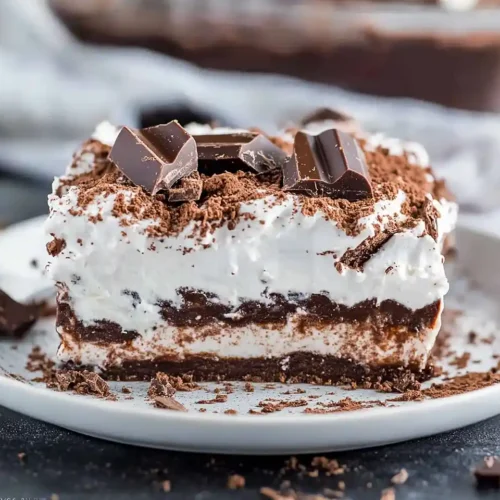
This no bake chocolate lasagna layers Oreo crust, creamy cheesecake, rich chocolate pudding, and fluffy whipped topping for an easy, crowd-pleasing dessert.
What Is No Bake Chocolate Lasagna?
No bake chocolate lasagna combines crushed Oreos with melted butter for a crunchy base, topped with silky cream cheese cheesecake, rich chocolate pudding made from instant mix and cold whole milk, and billowy Cool Whip—creating four distinct layers of chocolatey heaven that taste like the lovechild of tiramisu and a giant Oreo cookie.
I first made this no bake chocolate lasagna for a potluck five years ago, and I’ve been asked to bring it to every gathering since. It’s become my signature dish, the one people text me about weeks before the event. There’s something magical about a dessert that looks this impressive but requires zero oven time.
Why You’ll Love This Chocolate Lasagna Dessert
This easy chocolate lasagna practically makes itself while you’re doing literally anything else—no hot oven heating up your kitchen, no precise baking temperatures to worry about. The Oreo crust stays wonderfully crunchy even after two days in the fridge (if it lasts that long). You can make it a full day ahead, which means less stress and more time with your guests.
Obsessed with make-ahead, layered desserts? Our no-bake Biscoff cheesecake layers buttery cookies and dreamy cheesecake filling—perfect for summer parties and fridge-friendly sweetness.
The layers are distinct yet harmonious, like a really good choir where you can hear each voice but they blend beautifully. According to King Arthur Baking, no-bake desserts rely on refrigeration rather than heat to set their structure, making them perfect for summer entertaining or when your oven’s already occupied with dinner.
I’ve served this to chocolate skeptics (yes, they exist) and watched them go back for seconds. Kids adore it because it tastes like cookies and ice cream had a baby. Adults love it because it’s sophisticated enough for dinner parties but comforting enough for a Tuesday night couch session.
Table of Contents
No Bake Chocolate Lasagna
Equipment
- 9×13-inch baking dish
- food processor or blender
- Electric mixer or sturdy whisk
- rubber spatula
- Mixing bowls (medium and large)
- Offset spatula (optional)
- Bench scraper (optional)
Ingredients
Crust Layer
- 14.3 oz Oreos, whole pack with cream 405g, regular Oreos work best
- 6 Tbsp unsalted butter, melted salted works in a pinch
Cheesecake Layer
- 12 oz cream cheese, room temperature crucial for smooth texture
- 1 tsp vanilla extract pure vanilla recommended
- ¼ cup powdered sugar
- 8 oz Cool Whip, refrigerated first container for cheesecake layer
Chocolate Pudding Layer
- 7.8 oz instant chocolate pudding mix two 3.9 oz packages
- 3 ¼ cups cold whole milk creates creamiest texture
Top Layer
- 8 oz Cool Whip, refrigerated second container for top layer
- 3 Tbsp crushed Oreos reserved from crust for garnish
Instructions
- Add the entire package of Oreos (cream and all) into your food processor and pulse until you get fine, uniform crumbs that look like dark cocoa powder with tiny white flecks. Scoop out about 3 tablespoons of these crumbs into a small bowl and set aside for garnish later. Transfer the remaining crumbs to a medium bowl, pour in the melted butter, and stir with a fork until every crumb is coated and the mixture looks like wet sand.
- Dump the Oreo-butter mixture into your 9×13-inch baking dish and press firmly with a spatula or the bottom of a measuring cup to create an even, compact crust covering the entire bottom. You want it tight and flat—no gaps or loose spots. Pop the dish into the refrigerator while you make the cheesecake layer to help the crust firm up.
- In a large bowl, beat the room-temperature cream cheese with an electric mixer on medium speed until it’s completely smooth and fluffy, about 2 minutes. Add the vanilla extract and powdered sugar, beating until combined and silky. Gently fold in the first 8-ounce container of Cool Whip with a rubber spatula using wide, sweeping motions until the mixture is uniform and cloud-like.
- Remove your crust from the fridge and carefully spread the cheesecake mixture over it in an even layer, reaching all the way to the edges. An offset spatula is your best friend here. Return the dish to the refrigerator while you prepare the pudding.
- In a clean bowl, whisk together the instant chocolate pudding mix and cold whole milk vigorously for about 2 minutes until the pudding starts to thicken noticeably. It should coat the back of a spoon and look glossy. Working quickly before the pudding sets too much, spread it evenly over the cheesecake layer, making sure to reach the corners and edges.
- Refrigerate until the pudding is completely set and doesn’t jiggle when you gently shake the pan, about 30-45 minutes.
- Spread the second 8-ounce container of Cool Whip over the set chocolate pudding layer, creating swirls and peaks with your spatula. Sprinkle those reserved crushed Oreos over the top. Cover the dish with plastic wrap (be careful not to let it touch the Cool Whip) and refrigerate for at least 2 hours, though overnight is even better for fully developed flavors and clean-cutting slices.
Notes
Nutrition
Nutritional Peek
| Per Serving | Amount |
|---|---|
| Calories | 380 |
| Protein | 4g |
| Carbohydrates | 42g |
| Fat | 22g |
| Servings | 16 |
Based on a 16-serving pan. Because life’s too short to skip dessert, but it’s nice to know what you’re enjoying.
Ingredients for Your No Bake Chocolate Lasagna Recipe
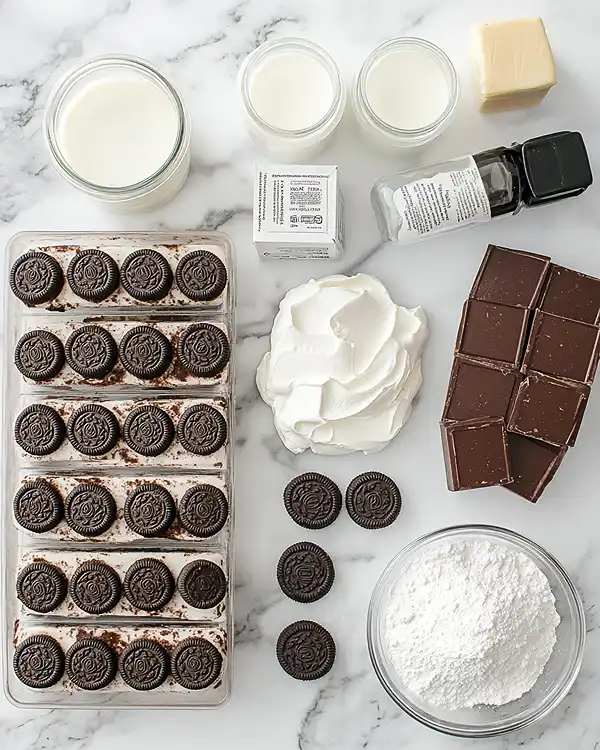
This chocolate lasagna dessert comes together with pantry staples and ingredients you can grab at any grocery store. The measurements are forgiving too, so don’t stress if you’re slightly over or under.
| Amount | Ingredient | Notes |
|---|---|---|
| 14.3 oz (405g) | Oreos, whole pack with cream | Regular Oreos work best; I’ve tried the double-stuffed and they’re a bit too sweet |
| 6 Tbsp | Unsalted butter, melted | Salted works in a pinch, just skip any extra salt |
| 12 oz | Cream cheese, room temperature | This is crucial—cold cream cheese creates lumps you’ll regret |
| 1 tsp | Vanilla extract | Pure vanilla makes a difference here |
| 1/4 cup | Powdered sugar | Also called confectioners’ sugar or icing sugar |
| 8 oz | Cool Whip, refrigerated | First container for the cheesecake layer |
| 7.8 oz | Instant chocolate pudding mix | Two 3.9 oz packages—I like Jell-O brand |
| 3 1/4 cups | Cold whole milk | Whole milk creates the creamiest pudding texture |
| 8 oz | Cool Whip, refrigerated | Second container for the top layer |
Equipment You’ll Need
Essential:
- 9×13-inch baking dish (glass or ceramic works beautifully)
- Food processor or blender (for crushing Oreos)
- Electric mixer or sturdy whisk
- Rubber spatula
- Mixing bowls (medium and large)
Nice to Have:
- Offset spatula (makes spreading layers so much easier)
- Plastic wrap or foil for covering
- Bench scraper (for neat serving slices)
How to Make No Bake Chocolate Lasagna Step by Step
This no bake chocolate lasagna recipe builds one delicious layer at a time, and each step is ridiculously simple. Take your time spreading each layer evenly—that’s the secret to those gorgeous Instagram-worthy slices.
1. Create the Oreo crust: Add the entire package of Oreos (cream and all) into your food processor and pulse until you get fine, uniform crumbs that look like dark cocoa powder with tiny white flecks. Scoop out about 3 tablespoons of these crumbs into a small bowl and set aside for garnish later—trust me, you’ll forget this step if you don’t do it now.
Transfer the remaining crumbs to a medium bowl, pour in the melted butter, and stir with a fork until every crumb is coated and the mixture looks like wet sand.
2. Press and chill the base: Dump the Oreo-butter mixture into your 9×13-inch baking dish and press firmly with a spatula or the bottom of a measuring cup to create an even, compact crust covering the entire bottom.
You want it tight and flat—no gaps or loose spots. Pop the dish into the refrigerator while you make the cheesecake layer (this helps the crust firm up and stay put when you spread the next layer).
3. Whip up the cheesecake layer: In a large bowl, beat the room-temperature cream cheese with an electric mixer on medium speed until it’s completely smooth and fluffy, about 2 minutes—no lumps allowed here. Add the vanilla extract and powdered sugar, beating until combined and silky.
Gently fold in the first 8-ounce container of Cool Whip with a rubber spatula using wide, sweeping motions until the mixture is uniform and cloud-like.
Remove your crust from the fridge and carefully spread this cheesecake mixture over it in an even layer, reaching all the way to the edges (an offset spatula is your best friend here). Return the dish to the refrigerator while you prepare the pudding.
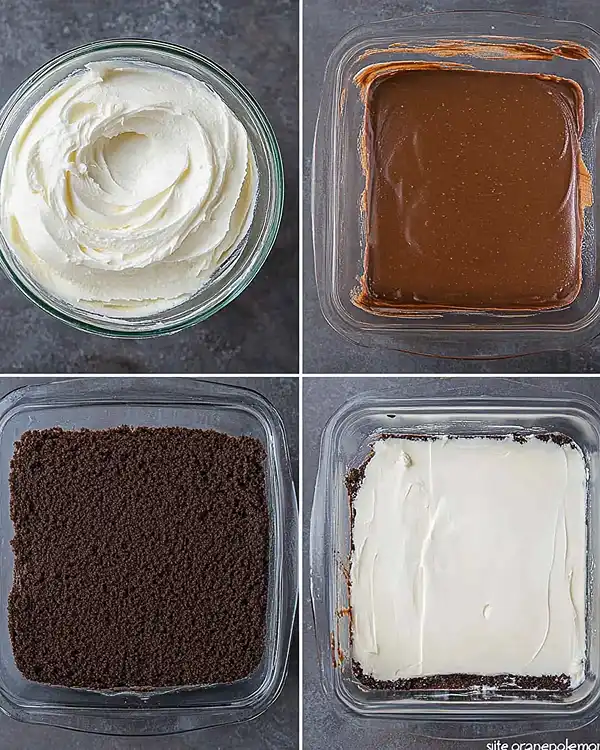
4. Mix the chocolate pudding layer: In a clean bowl, whisk together the instant chocolate pudding mix and cold whole milk vigorously for about 2 minutes until the pudding starts to thicken noticeably—it should coat the back of a spoon and look glossy. Don’t undermix or you’ll have soupy pudding that won’t set properly.
Working quickly before the pudding sets too much, spread it evenly over the cheesecake layer, again making sure to reach the corners and edges. Refrigerate until the pudding is completely set and doesn’t jiggle when you gently shake the pan, about 30-45 minutes.
5. Add the final flourish: Spread the second 8-ounce container of Cool Whip over the set chocolate pudding layer, creating swirls and peaks with your spatula if you’re feeling artistic. Sprinkle those reserved crushed Oreos over the top for a finished look that screams “I know what I’m doing in the kitchen.”
Cover the dish with plastic wrap (be careful not to let it touch the Cool Whip) and refrigerate for at least 2 hours, though overnight is even better for fully developed flavors and clean-cutting slices.
Pro Tips for Perfect Chocolate Lasagna Every Time
Temperature matters more than you think: Room-temperature cream cheese is non-negotiable for a smooth cheesecake layer. Cold cream cheese creates lumps that no amount of beating will fix.
According to Serious Eats, ingredients at similar temperatures (ideally around 65-70°F) create a stable emulsion in no-bake desserts, preventing separation and ensuring a creamy, uniform texture throughout.
Chill between layers: Those refrigeration pauses aren’t suggestions—they’re essential. Each layer needs to set before adding the next, or you’ll end up with a muddy mess where everything bleeds together. I learned this the hard way at 11 PM the night before a baby shower.
Use cold milk for pudding: Instant pudding sets faster and thicker with cold milk straight from the fridge. If you use room-temperature milk, your pudding layer might stay too soft and create a gloopy situation when you cut into it.
The overnight advantage: While you can serve this after 2 hours, letting it chill overnight allows the flavors to meld and marry beautifully. The Oreo crust softens just slightly, making it easier to cut through while maintaining that satisfying crunch.
What If Things Don’t Go Exactly as Planned?
Why is my cheesecake layer lumpy? Your cream cheese was probably too cold. Let it sit at room temperature for 30-45 minutes before using, or microwave it for 10-15 seconds to soften. Beat it thoroughly before adding other ingredients to ensure smoothness.
My pudding layer is runny—help! You might not have whisked it long enough, or your milk wasn’t cold enough. Pop the whole dish in the freezer for 20 minutes to help it set faster, then move it back to the fridge. It should firm up just fine.
The layers are sliding around when I cut it! This usually means you didn’t chill it long enough. Put it back in the fridge for another hour. Also, run your knife under hot water and wipe it clean between each cut for neat slices.
Can I use homemade whipped cream instead of Cool Whip? You can, but stabilize it first with gelatin or powdered sugar, or it’ll weep and deflate after a few hours. Cool Whip contains stabilizers that keep it fluffy for days, which is why most recipes call for it specifically in no-bake desserts.
Fun Ways to Switch Things Up
Peanut butter paradise: Add 1/2 cup of creamy peanut butter to the cheesecake layer for a chocolate-peanut butter version that tastes like a Reese’s cup in dessert form. You can also swap regular Oreos for peanut butter Oreos for double the nutty flavor.
Mint chocolate magic: Use mint Oreos for the crust and add 1/2 teaspoon of peppermint extract to the cheesecake layer. Top with crushed Andes mints instead of reserved Oreos for a refreshing twist that’s perfect after heavy meals.
Coffee lover’s dream: Replace 1/4 cup of the milk in the pudding with strong cooled coffee, and use coffee Oreos for the crust. The mocha flavor is sophisticated and cuts through the sweetness beautifully.
Berry beautiful: Add a thin layer of raspberry or strawberry preserves between the cheesecake and pudding layers for a fruity surprise that balances the richness.
Need a bright, fresh counterpoint to chocolate? Try our Lemon Blueberry Bundt Cake—bursting with citrus and berry flavors, and just as easy to make ahead.
How to Serve, Store, and Keep It Fresh
Serve this no bake chocolate lasagna recipe cold, straight from the fridge. Use a sharp knife dipped in hot water for the cleanest cuts—wipe the knife clean between slices for those picture-perfect servings. I like to serve it with a small dollop of extra whipped cream and fresh berries on the side for color and brightness.
Store leftovers covered tightly with plastic wrap or in an airtight container in the refrigerator for up to 4 days. The dessert actually improves on day two as the flavors deepen and meld together. Just know that the Oreo crust will soften gradually over time, though it stays pleasantly crunchy for at least 3 days.
You can freeze individual slices wrapped in plastic wrap and then foil for up to 2 months. Thaw in the refrigerator for about 4 hours before serving. The texture changes slightly after freezing—the Cool Whip becomes a bit denser—but it’s still absolutely delicious and perfect for portion control.
Zero-Waste Kitchen Creativity
Got leftover Cool Whip? Freeze dollops of it on parchment paper, then transfer to a freezer bag for instant toppings on hot chocolate, coffee, or future desserts. They stay good for up to a month and add a fun frozen element to warm drinks.
Those extra Oreo crumbs make an excellent ice cream topping or can be stirred into brownie batter for extra texture. You can also sprinkle them over yogurt parfaits or blend them into milkshakes for cookies-and-cream flavor.
If your cream cheese package has a bit left over, spread it on cinnamon-raisin bagels with a drizzle of honey, or beat it with a little powdered sugar and vanilla to make a quick fruit dip for apples and strawberries.

Your Questions About Chocolate Lasagna, Answered
Can I make this no bake chocolate lasagna ahead of time?
Absolutely! This dessert is actually better when made 24 hours in advance, giving all the layers time to set properly and the flavors to develop fully. Just keep it covered and refrigerated until you’re ready to serve.
Why did my chocolate lasagna turn out too soft to slice?
This usually happens when the dessert hasn’t chilled long enough or the pudding didn’t set properly before adding the top layer. Make sure you’re using instant pudding (not cook-and-serve), cold milk, and giving each layer adequate time to firm up in the refrigerator.
Can I use a different cookie for the crust?
Sure! Graham crackers, chocolate graham crackers, or Nilla wafers all work beautifully. You’ll need about 2 cups of fine crumbs mixed with the melted butter. The flavor profile will change, but it’ll still be delicious.
How do I prevent the layers from mixing together?
Patience is key—make sure each layer is completely set before adding the next one. Spread gently with an offset spatula rather than pressing down hard, which can disturb the layer beneath. Starting with a fully chilled crust also helps create a stable foundation.
Can I freeze chocolate lasagna for longer storage?
Yes, you can freeze the whole pan or individual slices for up to 2 months. Wrap tightly in plastic wrap and then aluminum foil to prevent freezer burn. Thaw overnight in the refrigerator before serving. The texture becomes slightly denser but remains tasty.
Time to Dig Into Your No Bake Chocolate Lasagna
There’s something deeply satisfying about pulling this gorgeous no bake chocolate lasagna from the fridge and watching people’s faces light up when they take that first bite. Four perfect layers of chocolate bliss with barely any effort—that’s the kind of kitchen magic we all need more of in our lives.
I’d love to hear how yours turns out! Drop a comment below with your favorite variation or snap a photo and tag us with your creation. And if you’re on a chocolate kick (who isn’t?).
Baked with love by Rebeccah Ellene.

