Key Lime Pie with Graham Cracker Crust
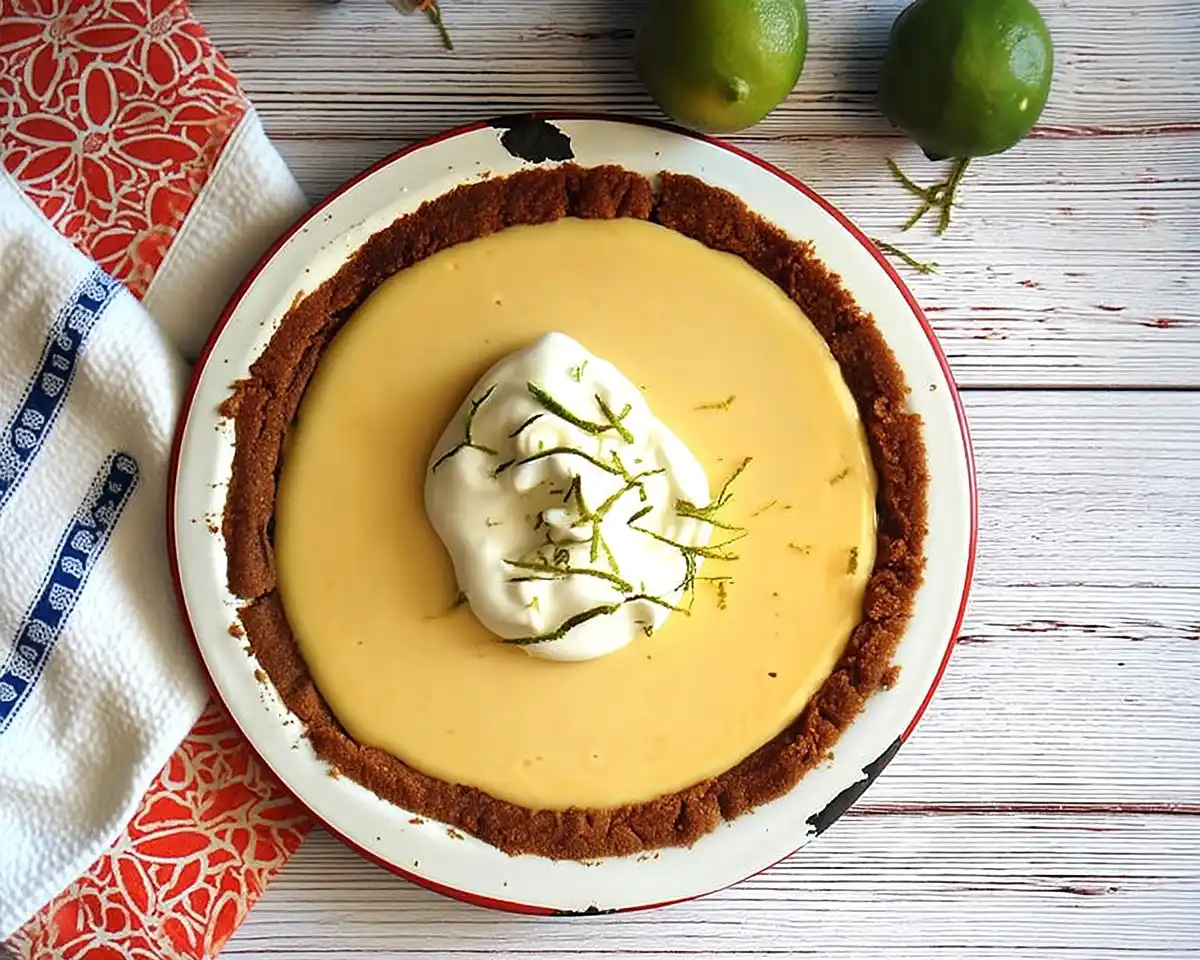
This classic key lime pie recipe delivers sunshine in every bite—buttery graham crust meets silky lime custard. Easy enough for beginners, impressive enough for guests!
This key lime pie with graham cracker crust combines a buttery, golden crust with a smooth, tangy lime custard that’ll transport you straight to the Florida Keys. With just a handful of ingredients and about 30 minutes of hands-on time, you’ll have a dessert that tastes like summer in a slice.
I’ll never forget the first time I tasted authentic key lime pie on a trip to Key West—it was like bottled sunshine with that perfect balance of sweet and tart. Ever since, I’ve been perfecting this classic key lime pie recipe in my own kitchen, and I’m thrilled to share it with you today.
The buttery graham cracker base provides the perfect canvas for that creamy, zesty filling that makes your taste buds do a happy dance. If you’re into citrus desserts, you’ll also want to check out my chocolate peanut butter mug cake for when you need something quick and satisfying.
Table of Contents
Why You’ll Love This Homemade Key Lime Pie with Crust
This homemade key lime pie with crust is about to become your new favorite dessert, and here’s why:
- It’s surprisingly simple – No fancy techniques or confusing steps, just straightforward baking that works every single time
- That graham cracker crust – Sweet, buttery, and with just the right amount of crunch to contrast the silky filling
- Fresh lime zing – Real lime juice gives you flavor that store-bought versions can’t touch
- Make-ahead friendly – Perfect for dinner parties since it needs to chill anyway
- Crowd-pleasing magic – I’ve never met anyone who didn’t swoon over a slice
I learned the secret to the perfect crust texture from a baking class years ago: you need just enough butter to hold the crumbs together without making them greasy. Too little and your crust crumbles apart; too much and it gets soggy.
According to King Arthur Baking Company, the ideal ratio is about 4 tablespoons of butter per cup of crumbs, which this recipe nails perfectly.
Here’s a personal tip from my kitchen disasters (yes, plural): always let your crust cool completely before adding the custard. I learned this the hard way when my first attempt turned into a soupy mess because I was too impatient. Trust the process!
Nutritional Information (Per Slice, Serves 8)
| Nutrient | Amount |
|---|---|
| Calories | 385 |
| Protein | 6g |
| Carbohydrates | 48g |
| Fat | 19g |
| Sugar | 38g |
| Fiber | 0.5g |
Note: Values are approximate and will vary based on specific ingredients used.
Ingredients You’ll Need
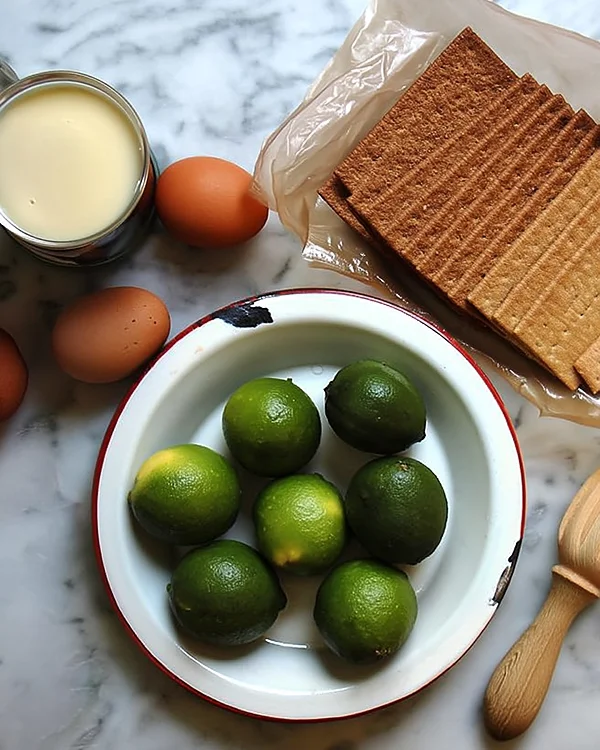
Let me walk you through what makes this easy key lime pie with graham crust come together beautifully. Everything’s easy to find, and chances are you’ve already got most of it in your pantry.
For the Graham Cracker Crust
| Amount | Ingredient |
|---|---|
| 1¼ cups | Graham cracker crumbs (about 9 whole crackers or one sleeve) |
| 5 tablespoons | Unsalted butter, melted |
| 3 tablespoons | Granulated sugar |
| 1 generous pinch | Kosher salt |
Pro tip: I always use unsalted butter so I can control the salt level—it makes a surprising difference in bringing out the sweetness!
For the Key Lime Custard
| Amount | Ingredient |
|---|---|
| 1 can (14 oz) | Sweetened condensed milk |
| 4 | Egg yolks (save those whites for meringue if you’re feeling fancy!) |
| ½ cup | Fresh lime juice (from 4-5 limes—about 8-10 Key limes if you can find them) |
| 1 tablespoon | Lime zest (the secret weapon for extra citrus punch) |
| Optional | Fresh whipped cream for topping |
A word about limes: while true Key limes are smaller and more aromatic, regular Persian limes work beautifully too. I actually prefer Persian limes because they’re easier to juice and the flavor is still wonderfully bright.
Whatever you do, skip the bottled lime juice—fresh really does make all the difference here. If you’re looking for quality pie plates and baking tools, I’ve got recommendations that’ll last you years.
Equipment You’ll Need
Here’s what to gather before you start:
Essential:
- 9-inch pie plate (I love a glass one so you can see if the bottom’s browning)
- Food processor (or a rolling pin and zip-top bag for crushing crackers)
- Mixing bowls (medium and small)
- Measuring cups and spoons
- Rubber spatula
- Zester or microplane
Nice to Have:
- Citrus juicer (saves your hands from cramping)
- Pastry brush (for evening out the butter)
- Kitchen scale (for precision, though measurements work great too)
Step-by-Step Instructions
Let’s make this key lime pie with graham cracker crust together! I promise it’s easier than you think, and your kitchen’s about to smell amazing.
Making the Graham Cracker Crust
Preheat your oven to 375°F. Get this going first—there’s nothing worse than having everything ready and realizing you forgot to heat the oven (been there!).
Create your graham cracker crumbs. Toss those graham crackers into a food processor with the sugar and salt, then pulse until you’ve got fine, even crumbs. They should look like coarse sand, not powder. No food processor? No problem! Put the crackers in a zip-top bag and go to town with a rolling pin—it’s surprisingly therapeutic.
Add the melted butter. Pour that golden butter over your crumbs and stir until every bit is moistened. The mixture should hold together when you squeeze it in your palm but still feel crumbly. If it’s too dry, add another half tablespoon of butter; too wet means you need a couple more tablespoons of crumbs.
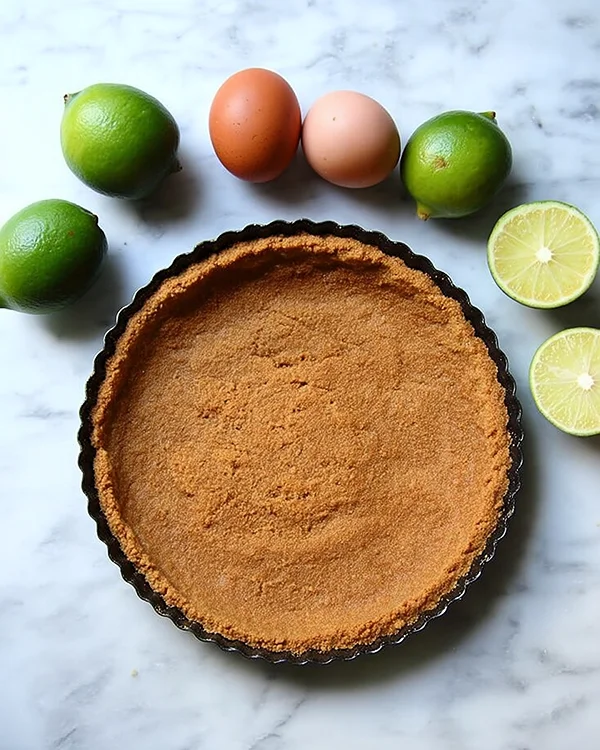
Press into your pie plate. Here’s where technique matters: start by sprinkling the mixture evenly across the bottom, then use the bottom of a measuring cup (or your fingers) to press firmly into the bottom and up the sides. You want it compact enough to hold together but not so compressed it becomes rock-hard. Pay extra attention to where the bottom meets the sides—that corner tends to crack if it’s too thin.
Bake until toasted. Slide it into the oven for 15 minutes. You’re looking for a gorgeous golden brown and a nutty, toasted aroma that fills your kitchen. When you pull it out, it might seem fragile, but it’ll firm up as it cools. Let it cool completely to room temperature on a wire rack—this is crucial! (Remember my soupy disaster? Don’t be like early-baking me.)
Making the Key Lime Custard & Finishing Your Pie
Turn your oven down to 325°F. While your crust cools, adjust that temperature.
Mix your custard. In a medium bowl, whisk together the sweetened condensed milk, egg yolks, fresh lime juice, and zest. Don’t be alarmed when the mixture thickens slightly—that’s the acid in the lime juice reacting with the milk proteins. It’s supposed to do that! Whisk until everything’s smooth and uniform, with no streaks of yolk visible. The mixture should be pourable but slightly thickened, kind of like a thin pudding.
Pour into your cooled crust. Gently pour that sunny yellow custard into your graham cracker shell. Give the pie a gentle shimmy to settle everything and smooth the top (this is oddly satisfying). If you’ve got a few bubbles, just pop them with a toothpick.
Bake until just set. Bake for about 15 minutes—you’re looking for a custard that’s set around the edges but still has a tiny wobble in the center, about the size of a quarter. It’ll continue setting as it cools. If it’s still sloshing around after 15 minutes, give it another 2-3 minutes, but watch it closely. Overbaked key lime pie gets a weird, grainy texture.
Cool and chill. Let your pie cool to room temperature on the counter (about an hour), then cover loosely with plastic wrap and refrigerate for at least 3 hours, though overnight is even better. The flavors meld and intensify, and the texture becomes perfectly silky and sliceable.
Pro Tips for Key Lime Pie Perfection
This classic key lime pie recipe is forgiving, but these tips will take yours from good to absolutely stellar:
Room temperature eggs mix better. They blend more smoothly into the custard, giving you that velvety texture. Just set them on the counter while you make the crust.
Zest before you juice. It’s so much easier to zest a whole lime than trying to wrestle with a juiced, floppy one. Plus, you’ll avoid getting your zester all sticky.
Don’t skip the salt in the crust. That pinch of salt makes the graham crackers taste more buttery and complex. It’s a tiny detail with big impact.
The wobble test is your friend. When checking for doneness, gently shake the pie—the center should jiggle like barely-set Jell-O. If the whole surface ripples like water, it needs more time.
Chill completely before slicing. I know waiting is hard, but warm key lime pie doesn’t slice cleanly. For picture-perfect slices, wipe your knife with a hot, damp cloth between each cut.
For more on the science of custards and how eggs set when baked, Serious Eats has an excellent deep-dive into the chemistry that’ll make you an even better baker.
Troubleshooting Common Issues
Even experienced bakers hit snags sometimes. Here’s how to fix the most common key lime pie problems:
Crust is too crumbly: You needed a touch more butter. Next time, add an extra tablespoon and press more firmly. For now, chill it well—that helps it hold together for serving.
Crust is soggy: Either the crust wasn’t fully cooled before adding the filling, or it wasn’t baked long enough initially. The crust should be deeply golden and smell toasty before it’s ready.
Custard didn’t set: Two likely culprits—your oven might run cool (get an oven thermometer!), or you didn’t bake it quite long enough. If it’s still liquid after cooling, you can actually return it to a 325°F oven for another 5-7 minutes.
Filling is grainy or curdled: This usually means it was overbaked or the oven was too hot. The custard should never get above 170°F internally. It’s still totally edible, just a bit different in texture.
Too tart or too sweet: Lime acidity varies by fruit. If yours is puckery, add an extra tablespoon of condensed milk next time. Too sweet? Add another tablespoon of lime juice.
Fun Variations & Creative Twists
Once you’ve mastered this easy key lime pie with graham crust, try these delicious variations:
Lemon Lime Pie: Swap half the lime juice for lemon juice for a milder, more complex citrus flavor that’s a bit less tangy.
Chocolate Graham Crust: Use chocolate graham crackers instead of regular ones—the subtle chocolate note is divine with the lime.
Coconut Lime Version: Add ¼ cup of sweetened shredded coconut to your crust and fold another ¼ cup into the custard for tropical vibes.
Topped with Toasted Meringue: Beat those leftover egg whites with sugar until glossy, spread over your chilled pie, and torch it for a stunning finish.
Mini Key Lime Pies: Divide the crust and filling among a 12-cup muffin tin lined with papers for adorable individual servings. Bake for 10-12 minutes instead.
Berry Swirl: Drop spoonfuls of raspberry or strawberry sauce onto the custard before baking and swirl with a toothpick for a gorgeous marbled effect.
Looking for more citrusy treats? My chocolate oatmeal no-bake cookies offer a completely different flavor profile but the same easy-to-make satisfaction.
Serving, Storage & Reheating Tips
Serving Suggestions: Top each slice with a generous dollop of fresh whipped cream and a thin lime wheel. The cream mellows the tartness beautifully. I also love adding a sprinkle of extra graham cracker crumbs on top for textural contrast.
Storage: Cover your homemade key lime pie with crust loosely with plastic wrap or foil and refrigerate for up to 4 days. The crust will soften slightly over time, but it’ll still be delicious. Just know that day one is peak crispness.
Freezing: This pie freezes wonderfully! Wrap tightly in plastic wrap, then foil, and freeze for up to 2 months. Thaw overnight in the fridge before serving. The texture stays remarkably creamy.
Reheating: Don’t! This classic key lime pie recipe is meant to be served cold. The cool, creamy texture against that crisp crust is exactly what makes it so refreshing.
No-Waste Kitchen Magic
Let’s use every bit of what we’ve got:
Those egg whites: Freeze them in ice cube trays (one white per cube) for future meringues, macarons, or egg white omelets. They’ll keep for months.
Lime husks: After juicing, toss the spent lime halves down your garbage disposal with cold water running—they clean and freshen it beautifully.
Extra graham cracker crumbs: Store in an airtight container and sprinkle over yogurt, ice cream, or use as a topping for fruit crisps.
Leftover sweetened condensed milk: It keeps for about a week refrigerated in an airtight container. Use it in coffee, drizzle over fresh fruit, or make a quick batch of fudge.

Key Lime Pie With Graham Cracker Crust FAQs
Can I freeze this key lime pie with graham cracker crust?
Absolutely! Wrap it well in plastic wrap and then aluminum foil, and it’ll keep beautifully in the freezer for up to 2 months. Thaw it overnight in the refrigerator before serving. The texture holds up remarkably well.
Do I have to use fresh lime juice for this classic key lime pie recipe?
I really recommend it—fresh lime juice gives you bright, vibrant flavor that bottled juice just can’t match. The difference is especially noticeable in a simple recipe like this where lime is the star. If you’re in a pinch, bottled works, but use a quality brand and maybe add a bit of extra zest for flavor.
Why is my graham cracker crust falling apart?
Usually this means there wasn’t quite enough butter to bind the crumbs, or the mixture wasn’t pressed firmly enough into the pan. Make sure you’re packing it in there, especially at the corners. If your crust feels dry before baking, drizzle in another half tablespoon of melted butter.
Can I make this easy key lime pie with graham crust ahead of time?
Yes! In fact, it’s better that way. You can make the crust 1-2 days ahead and keep it wrapped at room temperature. The fully assembled pie needs at least 3 hours to chill, but it’s even better after sitting overnight. Make it the day before your event for stress-free entertaining.
What’s the difference between Key limes and regular limes?
Key limes (also called Mexican limes) are smaller, seedier, and more aromatic with a slightly more complex flavor. Regular Persian limes are larger, easier to find, and still make an excellent pie. Honestly, I use Persian limes most of the time because they’re so much easier to juice, and the results are still fantastic.
How do I know when the custard is set?
Gently shake the pie—the center should have just a slight wobble, about the size of a quarter. The edges should look set and matte rather than shiny and liquid. It’ll continue to firm up as it cools and chills.
Can I use a store-bought graham cracker crust?
You can, though homemade tastes infinitely better and takes only 5 extra minutes. Store-bought crusts tend to be thinner and less buttery. If you go that route, skip the pre-baking step and just fill and bake according to the custard instructions.
Time to Dig In!
There you have it—your complete guide to making the most glorious key lime pie with graham cracker crust that’ll have everyone asking for the recipe. There’s something magical about that first bite, when the buttery crust gives way to that silky, tangy custard that tastes like pure sunshine. It’s the dessert that turns any meal into a celebration.
I’d love to hear how yours turns out! Drop a comment below with your favorite way to serve it, or tag your photos so I can see your beautiful creations. And if you’re on a citrus kick after making this, don’t miss my take on chocolate oatmeal no-bake cookies—a completely different flavor adventure but just as satisfying.
Baked with love by Rebeccah Ellene
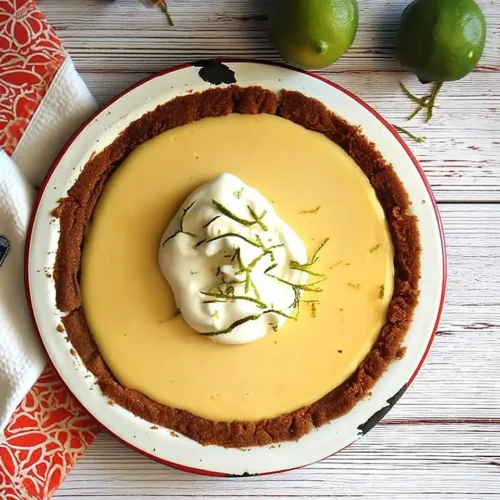
Key Lime Pie with Graham Cracker Crust
Equipment
- 9-inch pie plate
- mixing bowls
- rubber spatula
- Zester or microplane
- Citrus juicer (optional)
- Pastry brush (optional)
Ingredients
For the Graham Cracker Crust
- 1¼ cups graham cracker crumbs from 9 whole crackers or one sleeve
- 5 tablespoons unsalted butter melted
- 3 tablespoons granulated sugar
- 1 pinch kosher salt generous
For the Key Lime Custard
- 1 can (14 oz) sweetened condensed milk
- 4 egg yolks
- ½ cup fresh lime juice from 4-5 limes
- 1 tablespoon lime zest
- fresh whipped cream for topping, optional
Instructions
- Preheat the oven to 375°F.
- Create your graham cracker crumbs by pulsing the graham crackers with the sugar and salt in a food processor until you’ve got fine, even crumbs. They should look like coarse sand, not powder. No food processor? Put the crackers in a zip-top bag and crush with a rolling pin.
- Add the melted butter to the crumbs and stir until every bit is moistened. The mixture should hold together when you squeeze it in your palm but still feel crumbly.
- Press the mixture firmly into the bottom and sides of a 9-inch pie plate. Start by sprinkling the mixture evenly across the bottom, then use the bottom of a measuring cup or your fingers to press firmly. Pay extra attention to where the bottom meets the sides.
- Bake the crust for 15 minutes, until toasted golden brown and fragrant. Let it cool completely to room temperature on a wire rack.
- Turn your oven down to 325°F.
- In a medium bowl, whisk together the sweetened condensed milk, egg yolks, fresh lime juice, and zest until smooth and uniform, with no streaks of yolk visible. The mixture should be pourable but slightly thickened.
- Pour the custard into your cooled graham cracker shell. Give the pie a gentle shimmy to settle everything and smooth the top. Pop any bubbles with a toothpick.
- Bake for about 15 minutes, until the custard is set around the edges but still has a tiny wobble in the center, about the size of a quarter. It’ll continue setting as it cools.
- Let your pie cool to room temperature on the counter (about an hour), then cover loosely with plastic wrap and refrigerate for at least 3 hours, though overnight is even better.
- Top each slice with fresh whipped cream and a thin lime wheel before serving.

