Croissant Cube Dessert Recipe

Okay, so have you seen this croissant cube dessert recipe all over TikTok? Because I’m OBSESSED. These viral square croissants are literally everywhere right now, and honestly? They’re way easier to make at home than you’d think. No fancy equipment, no pastry degree needed – just you, your kitchen, and a little bit of patience.
Here’s the thing that really gets me: these trendy bakeries are charging like $6 PER CUBE. Six dollars! Meanwhile, you can make a whole batch of 6 at home for under five bucks. That’s what I call a win.
I’ve been playing around with this easy croissant cube recipe for weeks now (yep, my kitchen’s been a buttery mess), testing different tricks to make it as foolproof as possible.
The big secret? You don’t need those expensive cube molds everyone thinks you need. Just grab a regular loaf pan and get ready to impress literally everyone at your next brunch. Trust me, you’re gonna be the hero.
Table of Contents
Why You’re Gonna Love These Croissant Cubes

- No weird equipment needed – Seriously, just regular stuff from your kitchen
- So budget-friendly – Make 6 bakery-quality cubes for the price of ONE fancy café cube
- Beginner-friendly – I’ve got photos for everything, no stress
- Totally customizable – Chocolate? Pistachio? Matcha? Whatever you’re feeling!
- Make-ahead friendly – Prep the night before, bake fresh in the morning, be a genius
- Instagram gold – These things are guaranteed to blow up your feed
Look, these croissant cubes have that perfect combo of crispy-golden outside and buttery-flaky inside that makes traditional croissants so amazing. But here’s the cool part – that cube shape actually gives you MORE of that golden crust everyone fights over.
Plus, it’s part of the whole viral pastry trends 2025 thing taking over social media right now, so you’ll be ahead of the game.
What Are Croissant Cubes Anyway?
Okay so basically – croissant cubes (also called cube croissants or square croissant desserts, whatever you wanna call them) are just regular croissant dough but shaped into these perfect little geometric cubes instead of the usual crescent shape.
They went absolutely viral after this Swedish baker named Bedros Kabranian created them back in 2018, but it wasn’t until Le Deli Robuchon in London made them Instagram-famous in 2023 that everyone lost their minds.
The TikTok croissant cube trend is INSANE right now – we’re talking millions of views daily. Everyone’s doing these trending viral pastry designs with the geometric cube style.
Here’s why they’re actually genius: same flaky laminated dough as regular croissants, but because they’re cubes, you get SIX crispy sides instead of just a top and bottom. More golden buttery goodness = more happiness.
And honestly? Cube croissants are actually more forgiving than regular crescents. The geometric shape kind of hides any little imperfections in your lamination, which makes them perfect if you’re not some fancy pastry chef.
Most bakery versions come filled with pastry cream and cost $6-8 each, but you can totally make cube croissants without special equipment – that’s the whole point of this easy croissant cube recipe!
What You’ll Need (Ingredients)
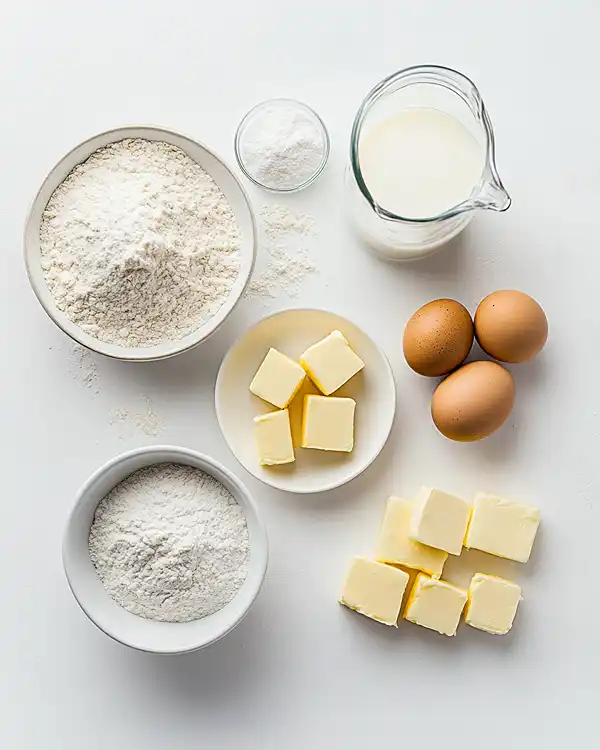
Here are the ingredients in table format:
For the Dough
| Ingredient | Amount |
|---|---|
| All-purpose flour | 4 cups |
| Granulated sugar | ¼ cup |
| Active dry yeast | 1 tablespoon |
| Salt | 1 teaspoon |
| Large egg | 1 |
| Cold butter, cubed | ¾ cup (1.5 sticks) |
| Lukewarm milk (around 110°F) | 1 cup |
For Lamination
| Ingredient | Amount |
|---|---|
| Cold butter | 1¼ cups (2.5 sticks) |
| All-purpose flour (for the butter block) | 2 tablespoons |
For Assembly & Baking
| Ingredient | Amount |
|---|---|
| Egg (for egg wash) | 1 |
| Water (for egg wash) | 1 tablespoon |
| Filling of choice | As needed |
Where to Grab the Good Stuff
Alright, so ingredient quality actually matters here (sorry, I know that sounds picky):
- All-Purpose Flour: You can get it from here, makes flour specifically for laminated doughs and it’s chef’s kiss.
- Active Dry Yeast: Red Star Yeast is my go-to – super reliable and you can find it basically anywhere.
-
Butter (THIS IS THE BIG ONE!): Get European-style butter with at least 86% butterfat. I’m talking:
- Kerrygold (you can find it everywhere)
- Normandy Butter (fancy stores)
- Any good local creamery butter
- Specialty Fillings: Check out my Sweet Pistachio Butter recipe or grab some premium pistachio butter from specialty stores.
Equipment (Still No Special Molds!)
What You Actually Need
- 1 big mixing bowl
- Kitchen scale (not required but honestly helpful)
- Rolling pin (at least 12 inches)
- Sharp knife or pastry cutter
- One standard 9×5-inch loaf pan OR six 3-inch ramekins
- Parchment paper
- Ruler (for being precise, trust me on this)
- Damp kitchen towel
- Pastry brush
- Baking sheet
- Cooling rack
Wanna Upgrade? (Optional But Nice)
If you’re serious about making these more than once, here’s some gear that’ll make your life easier:
KitchenAid Stand Mixer
Look, if you’re gonna make these regularly, a stand mixer is SO worth it. No more arm workout from kneading. (Commission earned if you purchase through our affiliate link)
Silicone Baking Molds
The loaf pan hack totally works, but silicone molds are reusable and the cubes just pop right out. Make sure they’re food-grade and rated to 400°F. (We earn a small commission from qualifying Amazon purchases)
OXO Stainless Steel Ruler
Okay hear me out – precise measurements = perfect lamination. A good ruler makes everything easier.
Bench Scraper
Makes handling the dough SO much easier and keeps your counter clean. Once you have one, you’ll wonder how you lived without it. (Commission earned)
Digital Instant-Read Thermometer – Amazon Affiliate Link
Takes all the guesswork out of checking if your milk is the right temp or if your cubes are done. Game changer. (Affiliate link with commission)
The DIY Mold Hack (This Is Genius)
No cube molds? No problem! This is how you make cube croissant no mold style – grab your regular loaf pan and some parchment paper. Cut the parchment into 3×3-inch squares and fold them to make dividers in the pan, creating six little cube compartments.
This is literally my favorite method and it works PERFECTLY for this viral square croissant dessert.
Let’s Make This Croissant Cube Dessert! (Step-by-Step)
This is your complete guide on how to make croissant cubes at home. Follow this easy croissant cube recipe and you’ll totally nail the viral pastry trend.
Step 1: Mix Up the Dough (15 minutes)
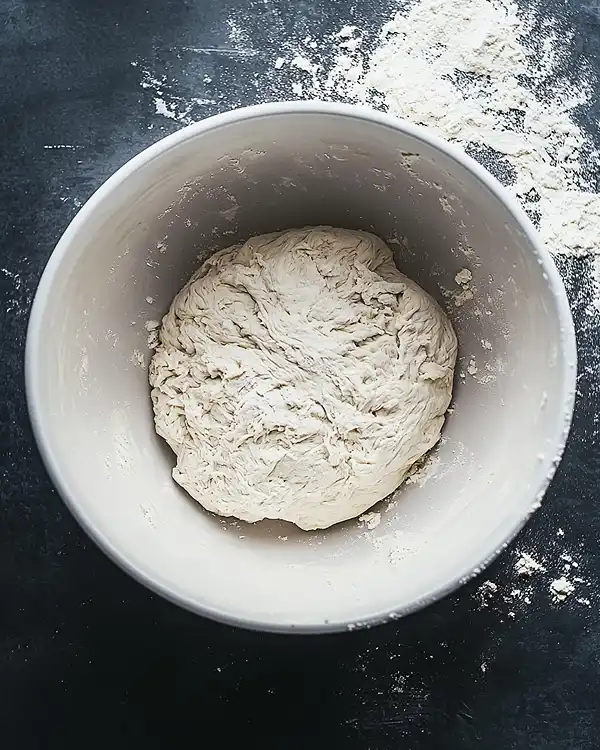
Grab your big bowl and mix together the flour, sugar, yeast, and salt.
In another bowl, pour your lukewarm milk. It should feel warm but not hot – if it’s too hot, you’ll kill the yeast and that’s no fun. You should see some tiny bubbles forming after a minute or two (that’s the yeast doing its thing).
Crack in the egg and stir it up.
Now cut that ¾ cup of cold butter into little pea-sized cubes. Add them to your flour mix and use your fingers to rub the butter in until it looks like coarse breadcrumbs or wet sand. Takes about 2-3 minutes. Don’t go crazy here – you want chunks, not a smooth paste.
Pour the milk-egg mixture into the flour-butter situation. Use one hand to bring it all together into a shaggy, kinda messy dough. It’ll look rough and slightly sticky – that’s EXACTLY what you want. Don’t knead yet!
Flour your counter a bit and dump the dough out. Now knead for 8-10 minutes using your palm to push it away, then fold it back. It’ll start sticky but get smoother and more elastic. After 10 minutes, it should be soft and just a tiny bit tacky.
Shape it into a rough 10×8-inch rectangle, wrap it up tight in plastic wrap, and stick it in the fridge for at least 2 hours (or honestly just leave it overnight).
What you’re looking for: After kneading, the dough should be smooth, kinda shiny, and stretchy. Poke it – it should bounce back slowly.
Step 2: Make the Butter Block (10 minutes)
Grab that dough from the fridge. You’ll need it soon, but first let’s deal with the butter block for lamination.
Cut 1¼ cups of cold butter into cubes and toss them in a food processor. Pulse until it’s almost sandy. Add the 2 tablespoons of flour and pulse a few more times. The flour keeps the butter from getting all smeary during lamination.
Put the butter between two sheets of parchment and use your rolling pin to gently shape it into a 6×8-inch rectangle about ¼ inch thick. Don’t press too hard – keep that butter cold!
Pop it on a plate and into the fridge until it’s firm but still bendy. Should feel like a soft butter stick that bends without cracking. Usually takes 10-15 minutes.
What you’re looking for: The butter block should be totally even with no lumps. If it gets too hard, just let it sit out for 2-3 minutes.
Step 3: First Lamination (15 minutes + 45 minutes chill)
Get your dough from the fridge. If it’s super cold and stiff, let it hang out at room temp for 3-5 minutes so you can actually roll it.
Flour your counter lightly. Roll the dough into a 12×8-inch rectangle (about ¼ inch thick), with one of the 8-inch sides facing you. Try to keep it even throughout.
Grab that butter block from the fridge and remove the parchment. Slap it on the right half of your dough rectangle, leaving about a ½-inch border on the right edge.
Fold the left half over the butter, covering it completely. Gently press the edges to seal.
Now for the “letter fold” – this is where the magic happens. Roll everything out into an 18×6-inch rectangle, keeping it about ¼ inch thick.
Picture dividing it into thirds. Fold the right third over the middle, then fold the left third over that – like you’re folding a letter to mail. Boom, you’ve got three layers!
Wrap it in plastic and back in the fridge for 45 minutes.
What you’re looking for: You should see butter streaks in the dough. When you look at the edge, you should see distinct layers, not just a blended mess. If butter’s breaking through, your dough was too warm – it’s okay, just refrigerate and keep going.
Step 4: Second and Third Lamination (20 minutes + 90 minutes chill)

Pull the dough out. Let it chill for 2-3 minutes if it’s super stiff.
Do the exact same thing again: roll to 18×6 inches, fold in thirds like a letter, wrap, fridge for 45 minutes.
After that second fold, do it ONE MORE TIME: roll to 18×6 inches, fold in thirds, wrap, fridge for 45 minutes.
After this third fold, your dough is officially laminated and ready to rock! You’ve now got hundreds of thin butter-and-dough layers.
What you’re looking for: After each fold, you should see more and more layers when you peek at the edge. By the third fold, it should look almost marbled with super thin lines.
Step 5: Shape Those Cubes (15 minutes)
Get your laminated dough and let it rest for 5 minutes until it’s cool but workable.
Flour your counter. Roll it into one big 12×16-inch rectangle about ¼ inch thick.
Use a sharp knife to cut it into 6 equal strips. If you’re using a loaf pan, each should be roughly 4 inches wide and 12 inches long. Using ramekins? Adjust the size to fit.
For each strip, start at one end and roll it tightly into a spiral, keeping it pretty snug. You’re making a long spiral rope of dough.
Now coil that spiral rope into your mold – ramekin or loaf pan section. Tuck the end under and it should naturally form a cube-ish shape.
Do this with all six strips. If using the loaf pan, make sure each cube has room to breathe – they need space to rise.
Cover them loosely with plastic wrap or a damp towel.
What you’re looking for: Each cube should be a tight spiral. Looking from above, you should see that spiral pattern. Some air pockets are totally fine and actually create cool texture!
Step 6: Let Croissant Cubes Rise (45 minutes to 1 hour)
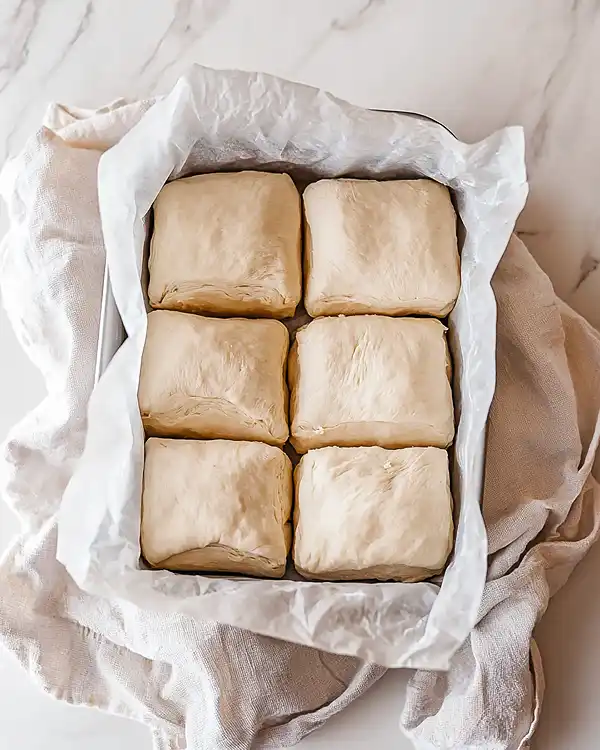
Put your cubes somewhere warm to rise. You want 75-80°F. Try:
- Near (not ON) a warm oven that’s been preheated to 200°F then turned off
- Inside an oven with just the light on
- On your counter if your kitchen’s warm
- In a proofing box if you’re fancy like that
Cover with that damp towel so they don’t dry out.
Watch for them to roughly double in size. They should look puffy and light. Usually 45 min to an hour, but if your kitchen’s cold, might take 1.5 hours.
Wanna check if they’re ready? Poke one gently with a floured finger. If the dent slowly springs halfway back, you’re good. Springs back completely? Give it more time. Dent stays? Might be over-proofed (but they’ll still bake fine, don’t stress).
What you’re looking for: Cubes should’ve gotten way bigger and look smooth and slightly domed. You might see some puffiness between layers – that’s perfect!
Step 7: Bake Time! (25-30 minutes)
About 10 minutes before baking, preheat your oven to 400°F (200°C). Make sure there’s at least 2 inches of space above your molds on the rack.
Take off that damp towel. Whisk together the egg and 1 tablespoon water for your egg wash.
Brush that egg wash all over the tops and sides of each cube. This is what gives them that gorgeous golden color and shine. Try not to brush the parchment if you’re using the loaf pan method.
Carefully get your molds onto the baking sheet and into the oven.
Bake at 400°F for 15 minutes. They should start puffing up and turning light golden. DON’T open the oven!
After 15 minutes, drop the temp to 350°F (175°C) and keep baking another 10-15 minutes until they’re deep golden brown everywhere.
How to tell they’re done:
- Deep golden-brown color all over
- Tap the side gently – should sound hollow
- Instant-read thermometer should read around 190°F (88°C)
- Sides should feel crispy
What you’re looking for: Deep golden brown, almost mahogany on the most exposed edges. You should see visible flaky layers starting to separate on the sides. Tops should be glossy from that egg wash.
Step 8: Cool and Fill (10 minutes, then eat!)
Carefully pull the baking sheet out. Let the cubes hang in their molds for 5 minutes – this helps them set so they don’t fall apart.
Run a thin knife around the edges of each cube to loosen them. Gently tip each one out onto a cooling rack (or straight onto a plate if you can’t wait to serve them warm – I get it).
They’re still super warm and delicate, so be gentle. Let them cool at least 5 minutes before cutting.
Wanna add filling? Let them cool completely (about 30 minutes). Use a sharp serrated knife to cut a small opening in the top (1-2 inches). Use a piping bag or small spoon to fill with whatever you’re into – pistachio cream, chocolate, matcha, anything!
What you’re looking for: When you break one open, you should see distinct thin layers separated by air pockets. Crispy outside, tender inside. The layers should peel apart, not crumble.
Pro Tips So You Don’t Mess Up
Keep everything COLD: This is the #1 secret. Warm butter and warm dough = disaster. If your kitchen’s hot, work fast and chill between steps. Dough getting sticky while shaping? Back in the fridge for 10-15 minutes.
Don’t rush the chilling: Those 45 minutes between folds aren’t optional – that’s when the gluten chills out (literally) and the butter gets solid, creating those perfect layers. Rushing this is the #1 reason people end up with tough, dense cubes.
Use a ruler: I know it sounds fussy, but measuring your rectangles during lamination actually matters. You want 18×6 inches with even thickness. Uneven thickness = uneven baking and some parts will be way more caramelized than others.
Find a warm spot to proof: Laminated dough needs actual warmth to rise properly. Cold kitchen = cubes that don’t rise = dense pastries. Use your oven light or put them near something warm.
Egg wash is non-negotiable: Technically you CAN skip it, but… why would you? It takes 30 seconds and makes them look SO good.
The hollow sound test: When checking doneness, tap the side and listen. Hollow sound = the inside is properly cooked. Sounds dull and heavy? Needs more time.
Freeze extras: You can totally freeze unbaked cubes. Freeze on a tray first, then bag them. They keep for 3 months. To bake from frozen, add 10-15 minutes to rising time and 5 minutes to baking.
5 Filling Ideas That Slap
Classic Chocolate Ganache
Heat 1 cup heavy cream until it’s steaming. Pour over 8 oz chopped dark chocolate and wait 2 minutes. Stir until smooth. Let it cool before piping. Rich, decadent, and stays perfect at room temp.
Viral Pistachio Cream

Make your own or buy pistachio butter and mix with cream cheese and honey. For homemade, blend roasted pistachios with butter, powdered sugar, and a tiny pinch of salt until creamy. This is PURE Instagram gold.
Check out my Sweet Pistachio Butter: Ultimate 5-Ingredient Homemade Recipe for the best method, or my Pistachio Butter for Dubai Chocolate Recipe for something extra fancy.
Matcha Cream
Whisk 2 tablespoons matcha powder with 2 tablespoons hot water until smooth. Fold into 1 cup whipped cream sweetened with 2 tablespoons powdered sugar. The green color is STUNNING and the earthy flavor is perfect with butter.
Salted Caramel
Use store-bought or make your own: melt 1 cup sugar, carefully add 8 tablespoons butter, 1 cup heavy cream, and 1½ teaspoons sea salt. Let it cool a bit before piping. Tastes like a French pastry shop.
Savory Cheese & Herb
Mix softened cream cheese with fresh herbs (thyme, rosemary, chives), grated sharp cheddar, salt, and pepper. Turns croissant cubes into a savory appetizer – perfect for brunch or parties.
Pro tip: Fill cooled cubes right before serving if you want maximum crispiness. If you fill them too early, the filling can soften the pastry. For make-ahead, pipe filling just before guests show up.
Storage & Make-Ahead Stuff
Storing baked cubes: Fresh croissant cubes stay crispy for about 2 days in an airtight container at room temp. Getting soft? Pop them in a 300°F oven for 5 minutes to re-crisp.
Freezing baked cubes: Baked and cooled cubes freeze great for up to 3 months. Freeze on a tray, then bag them. To reheat, put frozen cubes straight into a 350°F oven for 8-10 minutes.
Dough in advance: The laminated dough can be made 2 days ahead. After the final fold, wrap tight and refrigerate instead of shaping. When ready to bake, let it warm up for 10 minutes, then shape.
Freezing unbaked shaped cubes: Shape the cubes and let them rise until just barely puffy (about 25 minutes). Freeze on a tray, then bag. When you’re ready to bake, thaw at room temp for an hour while they finish rising, then egg wash and bake. Might need an extra 5 minutes if they’re still cold.
Two-day method: Make the dough Day 1, do all three folds, refrigerate overnight. Day 2, shape, proof, and bake. This is actually awesome because the dough is super well-chilled and easier to work with.
When Your Croissant Cube Dessert Go Wrong (Troubleshooting)
Even pros mess up laminated dough sometimes. Here’s how to fix the most common issues.
Problem: Flat, Dense Cubes (No Rise)
Why it happened:
- Yeast was old or killed by too-hot water
- Proofing spot was too cold
- Over-kneaded the dough in Step 1
- Didn’t proof long enough
Fix it next time:
- Check yeast expiration date
- Use a thermometer – milk should be 110°F, not hotter
- Knead until smooth and elastic, not until sticky again
- Proof somewhere consistently 75-80°F minimum
- Give it extra time if your kitchen’s cold
Problem: Butter Leaking Out While Baking
Why it happened:
- Butter was too soft during lamination (kitchen too warm)
- Butter wasn’t evenly spread in the dough
- Too much filling leaked out
- Edges weren’t sealed during folding
Fix it next time:
- Work in a cool kitchen, keep butter cold
- Press edges together carefully during folds
- Use less filling or thicker filling
- If butter starts leaking during lamination, immediately refrigerate for 15 minutes
Problem: Tough or Chewy Cubes
Why it happened:
- Dough was overworked
- Folds were too tight
- Baked at too low temp
- Over-proofed before baking
Fix it next time:
- Handle dough gently
- Fold softly during lamination, don’t press hard
- Check oven temp with a separate thermometer
- Don’t let cubes rise more than 50% bigger than their shaped size
Problem: Uneven Layers or Marbled Look
Why it happened:
- Butter and dough were different temps during folding
- Didn’t chill long enough between folds
- Rolling thickness wasn’t consistent
Fix it next time:
- Keep both butter and dough very cold
- Don’t skip or shorten chilling times
- Use a ruler for even thickness
Problem: Cubes Stick to Mold
Why it happened:
- Mold wasn’t greased or lined
- Left cubes in mold too long
- Didn’t release carefully
Fix it next time:
- Always grease or line molds
- Remove cubes while still warm (5-10 min after baking)
- Use a thin knife to gently loosen edges
Fun Variations to Try
Flavor Twists for the Best Square Croissant Dessert
Chocolate-Filled Cubes: Add 3 tablespoons cocoa powder to the dough in Step 1. Drop flour to 3¾ cups. Fill with chocolate ganache for double-chocolate heaven.
Cinnamon Sugar Swirl: Before rolling spirals in Step 5, brush dough with melted butter and sprinkle with cinnamon-sugar. The spiral spreads it throughout.
Almond Cream Filling: Mix 1 cup almond flour with 6 tablespoons softened butter, ½ cup powdered sugar, and 1 egg white. Pipe into cubes for elegant vibes.
Seasonal Pumpkin Spice (Fall): Add 1 tablespoon pumpkin pie spice to dough. Fill with spiced cream cheese frosting sweetened with maple syrup.
Lemon Blueberry (Spring/Summer): Add 1 teaspoon lemon zest to dough. Fill with lemon curd mixed with fresh blueberries.
Dietary Swaps
Vegan Version:
- Swap butter for quality vegan butter (Miyokos or Naturli are great)
- Use oat milk or almond milk instead of dairy
- Use aquafaba (chickpea liquid) or flax egg for the dough
- Make egg wash from plant milk + 1 tablespoon maple syrup
- Lamination works exactly the same with vegan butter
Gluten-Free Version:
- Use 1:1 gluten-free flour blend (King Arthur or Bob’s Red Mill)
- Reduce yeast to 2½ teaspoons (GF dough rises faster)
- Add 1 tablespoon xanthan gum if your blend doesn’t have it
- Dough might be stickier – use extra flour as needed
- Everything else stays the same
Dairy-Free (but not vegan):
- Vegan butter for all butter
- Any non-dairy milk
- Regular egg for egg wash (or dairy-free if also vegan)
- Easiest swap since it’s just butter and milk

Croissant Cube Dessert FAQs
Can I really make croissant cubes without special cube molds?
YES! This whole Croissant Cube Dessert recipe is designed for regular kitchen stuff. I use a loaf pan with parchment dividers or ramekins. The DIY loaf pan trick in the Equipment section works amazing and costs nothing. This is how you make croissant cube without special equipment!
How long does this actually take?
Total time is 3-4 hours, but most of that is just waiting around while stuff chills and rises. You’re only actively working for about 45 minutes. Or spread it over two days: dough day one, shape and bake day two. Way less stressful!
What’s different between these and regular croissants?
Same dough, same technique – just different shaping. Croissant cubes are rolled into spirals and baked in cube containers instead of shaped into crescents. More crispy surface + easier to fill = win-win.
Can I prep these ahead?
Totally! Make shaped cubes up to 24 hours ahead, cover and refrigerate, then let them warm up and finish rising before baking (45 min to 1 hour). Baked cubes keep 2-3 days in an airtight container or freeze for 3 months.
Can I freeze the dough?
Yep! Freeze shaped, unbaked cubes on a tray, then bag them. Good for 3 months. Add 10-15 min to rising time and 5 min to baking. Some people freeze them right before they finish rising, then let them thaw and rise naturally.
Can I make vegan ones?
For sure! Use vegan butter (Miyokos or Naturli), plant milk, and plant milk + maple syrup for egg wash. Technique stays exactly the same and they come out just as crispy and flaky.
More Viral Desserts You’ll Love
Once you’ve nailed this easy croissant cube recipe, check out these other showstopping Instagram worthy desserts!
Viral Dubai Chocolate Pistachio Kataifi Cake – If you’re into chocolate and pistachio like in these cubes, this viral cake will BLOW YOUR MIND. Crispy kataifi outside, rich chocolate center, insane pistachio cream.
How to Make Dubai Chocolate with Pistachio Butter – Learn how to make those viral Dubai chocolate bars everyone’s obsessed with. Great for filling your cubes too!
Sweet Pistachio Butter: Ultimate 5-Ingredient Homemade Recipe – Make your own premium pistachio filling. So good you’ll never buy store-bought again.
Pistachio Butter for Dubai Chocolate Recipe – The fancier, silkier version of pistachio cream that looks super professional.
Burn Away Cake Recipe at Home – Another viral TikTok thing with that dramatic reveal factor. The presentation is INSANE.
Brown Butter Pistachio Cream Cookies – Simpler but just as impressive. Nutty brown butter + pistachio cream = heaven.
Crescent Roll Cookies Recipe – Love laminated dough but want something easier? These cookies use crescent rolls and deliver bakery vibes in minutes.
Crumbl Cookie Recipe: Easy to Make – Another viral fave with that perfect soft center and crispy edges. Way simpler than croissant cubes but still Instagram gold.
You Got This!
Okay so now you’ve got everything you need to make bakery-quality croissant cubes in your own kitchen. The most important thing? Don’t be intimidated by the lamination thing. Yeah, it takes patience and keeping stuff cold, but literally thousands of home bakers have done this successfully. You totally can too.
Real talk: your first batch might not be perfect, and that’s completely fine. Each time you make these, you’ll get better at understanding the dough, timing everything right, and feeling more confident. By your third or fourth batch, you’ll be cranking out cubes that look like they came from some $8-per-cube trendy café.
Start with classic chocolate filling to get the hang of the basic technique, then go wild with pistachio cream, matcha, or whatever sounds good once you’re comfortable.
Share your creations on Instagram and tag us—we LOVE seeing your delicious Instagram worthy desserts! Join the trending viral pastry movement and be part of this viral croissant cube phenomenon taking over TikTok and Instagram.
Pin this recipe for later, share it with your baking friends, and drop a comment telling me which filling you’re most excited to try! Which of these viral pastry trends 2025 are you tackling first?

Croissant Cube Dessert Recipe: No Special Mold Needed!
Equipment
Ingredients
For the Dough
- 4 cups all-purpose flour
- ¼ cup granulated sugar
- 1 tablespoon active dry yeast
- 1 teaspoon salt
- 1 large egg
- ¾ cup cold butter 1.5 sticks, cubed
- 1 cup lukewarm milk around 110°F
For Lamination
- 1¼ cups cold butter 2.5 sticks
- 2 tablespoons all-purpose flour for the butter block
For Assembly & Baking
- 1 egg for egg wash
- 1 tablespoon water for egg wash
- filling of choice chocolate, pistachio cream, matcha cream, caramel, or other preferred filling
Instructions
- Make the Dough: In a large mixing bowl, combine the flour, sugar, yeast, and salt. Stir to mix evenly. In a separate bowl, pour the lukewarm milk and let sit for 1 minute. Crack the egg into the milk and stir. Cut the ¾ cup cold butter into small cubes and rub into the flour mixture until it resembles coarse breadcrumbs (2-3 minutes). Pour the milk-egg mixture into the flour-butter mixture and bring together into a shaggy dough. Turn out onto a floured surface and knead for 8-10 minutes until smooth and elastic. Shape into a 10×8-inch rectangle, wrap tightly in plastic wrap, and refrigerate for at least 2 hours or overnight.
- Prepare the Butter Block: Cut 1¼ cups cold butter into small cubes and place in a food processor. Pulse until sandy. Add 2 tablespoons flour and pulse to combine. Between two sheets of parchment paper, roll the butter into a 6×8-inch rectangle about ¼ inch thick. Refrigerate until firm but pliable (10-15 minutes).
- First Lamination: Remove dough from fridge and let sit 3-5 minutes if very stiff. Roll into a 12×8-inch rectangle about ¼ inch thick. Place the butter block on the right half, leaving a ½-inch border. Fold the left half over the butter to cover completely. Press edges to seal. Roll into an 18×6-inch rectangle. Fold into thirds like a letter (right third over middle, left third over that). Wrap and refrigerate 45 minutes.
- Second and Third Lamination: Remove from fridge and let sit 2-3 minutes. Repeat the same process: roll to 18×6 inches, fold in thirds, wrap, and refrigerate 45 minutes. After second fold, repeat one final time: roll to 18×6 inches, fold in thirds, wrap, and refrigerate 45 minutes. Dough is now fully laminated.
- Shape the Cubes: Remove laminated dough and let rest 5 minutes. Roll into a 12×16-inch rectangle about ¼ inch thick. Cut into 6 equal strips (roughly 4 inches wide and 12 inches long). Roll each strip tightly into a spiral, then coil into prepared molds or loaf pan sections. Tuck ends under. Cover loosely with plastic wrap or damp towel.
- Final Proof: Place shaped cubes in a warm spot (75-80°F) to rise. Cover with damp towel. Let rise until roughly doubled in size, about 45 minutes to 1 hour. Test by gently poking with floured finger – dent should slowly spring back halfway.
- Bake: Preheat oven to 400°F (200°C). Whisk together egg and 1 tablespoon water. Brush egg wash over tops and sides of cubes. Bake at 400°F for 15 minutes, then reduce to 350°F (175°C) and bake 10-15 minutes more until deep golden brown. Should sound hollow when tapped and reach internal temp of 190°F (88°C).
- Cool and Fill: Remove from oven and let cool in molds 5 minutes. Run a thin knife around edges to loosen, then tip out onto cooling rack. Cool at least 5 minutes before cutting. For filling, let cool completely (30 minutes), cut a small opening in top (1-2 inches), and pipe in desired filling using piping bag or spoon.
Notes
- Keep everything cold: Temperature is everything for lamination. If your kitchen is warm, work quickly and chill between steps.
- Don’t rush chilling times: Those 45 minutes between folds are essential for proper lamination.
- Measure rectangles: Use a ruler during lamination for 18×6-inch rectangles with even thickness.
- Proof in warmth: Laminated dough needs real warmth (75-80°F) to rise properly.
- Egg wash matters: Creates gorgeous golden color and professional shine.
- Freeze for later: Freeze unbaked cubes on tray, then bag. Keep up to 3 months. Add 10-15 min to rising time and 5 min to baking time when baking from frozen.

